Tools list:
Scissors
12 paper trimmer
tape runner (adhesive)
Black pen
Stapler & staples
Double-sided tape
Foam Brushes
Paint brushes
Foam Stamps
Heidi Swapp Masks (various)
Paints (various colours)
Paint trays
Baby wipes
HS drama foam stamp
Materials list:
HS Blossoms (orange & pink)
HS Chipboard circle
HS chipboard clock
HS Small Chipboard flowers
HS Small Chipboard crowns
HS Small Chipboard Stars
HS Foam Letter Stamps
HS Journalling Spots
HS Orange and Cream tape
HS Pink tape
HS Rectangle gems (orange & pink
HS63809 Rub-ons Fussy, shapes Jet
Printed Acetate
White 9x9 cardstock
Album
Instructions:
Painting really is easy and with paint skills under your belt you can create a layout from almost nothing!
Painting is the perfect way to customise layouts and papers, so that your projects will be unique.
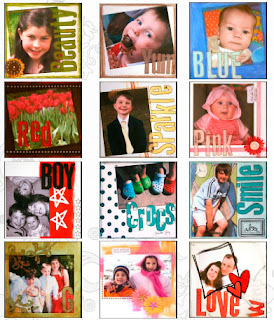
This class is technique based and you will learn the techniques that will help you to create pages that look
like these or you can use the skills to create your own designs!
Techniques:
Stamping with paint:
You can stamp with paint so easily many of us will have done it at school using potatoes or sponges! With
the foam stamps you just need to make sure that you have a good even layer of paint on your stamp and
that you apply an even pressure as you stamp. IF your stamp is incomplete you can return to the image with
the HS stamps as the clear plastic allows you to see where you are stamping.
Please note: Photo paper is very absorbent and will suck off more of the paint on the stamp than the cardstock.
Doodling:
This really needs no explanation as you just take your pen and draw! It is best if you don t try to be a perfectionist
and if you have a wonky line it all adds to the effect! Doodle on your photos as well to add more interest!
Direct to paper:
Painting straight on to the paper with either a brush or a dabber can scare some people especially when
they have to paint over the edges of the photo. DON T panic just slap it on and it will look great!
Dry brushing:
This technique gives you a lot more control over the wet brushing techniques such as direct to paper. You
take a dry paintbrush; apply paint and then brush off the excess on to a piece of kitchen paper. Then you can
apply paint to your paper a bit at a time, applying more paint to your brush as required. Dry brushing can also
be achieved with a dabber by using the paint in the applicator surface. Please note: You must keep the
brush dry for this technique if you rinse out the brush dry it out before using for a different colour.
Painting with foam brushes:
You can create interesting effects using a foam brush the simplest is to apply paint and then roughly brush
over an area. You will get a much patchier effect than with a traditional brush.
Masking:
This technique can be done with prebought masks or you can use elements as masks, or even masking
tape. First apply the mask, and then generously apply paint over the top, taking care not to lift the mask. Allow
the paint to dry for about 3 mins and then peel off the mask. Set aside to dry.
Painting with baby wipes:
This technique allows you to create great colour washed looks without all the hassle you also use less
paint using this technique. Apply you chosen colour of paint to a wet baby wipe and then rub all over your page. You can leave different effects in the paper by swirling the baby wipe, or dabbing it all over the base coat to
create a stippled effect! Dry brushing over this colour washed background will also create a verdegris type look.
Painting on acetate/plastic:
You can paint on most surfaces some just take longer to dry. If you want clean lines painting on the reverse of the
acetate gives a sharp look. Paint in the shapes allow to dry and then attach to your page using staples or similar. Alternatively
you could adhere the acetate using paint, apply the paint to the acetate and then stick to your page using
the wet paint
this will give you a more painted look. You can buy acetates or print them out using your home PC.
What we did!
Pink - (Stamping with paint & doodling)
Stick down the pink tapes and the photo. Stamp the letters using foam stamps and paint. Also paint chipboard circle
in pink. Allow to dry. Once dry doodle on the letters and edges, stick on the gems, flower etc and finish off with
Glossy accents.
Sparkle - (Stamping with paint & doodling)
Stick down the cream and orange tapes at an angle, adhere the photo. Stamp on the title using yellow paint. Once
dry add doodles.
Red - (Direct to paper painting covering whole page and edges of photo, stamping with paint & doodling)
Adhere photo to page, cover the page in black paint making sure that you overlap the edges of the photo. Allow to
dry. Stamp on the title using red paint. Allow to dry. Finish off with doodling and ribbon.
Blue - (Direct to paper painting covering whole page and edges of photo, stamping with paint & doodling)
Adhere photo to page, cover the page in blue paint making sure that you overlap the edges of the photo. Allow to
dry. Stamp on title using contrast colour. Allow to dry. Finish off with doodling.
Yum - (Dry brushing, stamping with paint & doodling)
Adhere photo to page. Dry brush all around the edges. Stamp the title. Allow to dry. Once dry finish off with doodling.
Beauty - (Dry brushing, stamping with paint & doodling)
Adhere photo to page. Dry brush all around the edges. Stamp the title. Allow to dry. Once dry finish off with doodling,
flower, clocks and gems.
Winter - (Painting with foam brushes)
Paint the paper with foam brushes in pink and orange. Attach photo, gems and journaling spot.
Boy - (Painting over masks and stamping with paint)
Apply masks, cover with paint. Allow to dry. Remove masks, adhere photo and stamp the title with paint. Finish off
with doodling.
Smile - (colour washed stippled background, dry brushing, stamping with paint and doodling)
Paint paper with a baby wipe. Once covered stipple using a baby wipe to give a ragged finish. Once dry attach picture,
stamp title and dry brush edges. Once dry doodle and finish with a fuzzy rub-on.
Grants - (Verdegis background, stamping with paint & doodling)
Paint background in green using a baby wipe. Once dry adhere photo and dry brush using gold paint. Stamp the images
and title using foam stamps stamp green first and then gold. Once dry finish off with doodling and glossy accents.
Love - (painting on acetate, stamping with paint, doodling)
Attach photo to page and stamp title. Paint the reverse of the acetate using a paintbrush. Once dry doodle on page
and then attach the acetate using staples and ribbon.
Crocs - (masking with paint, stamping with paint, dry brushing & doodling)
Apply masks, cover with paint. Allow to dry. Remove masks, adhere photo and stamp the title with paint. Dry brush
the edges of the page. Once dry finish off with doodling.
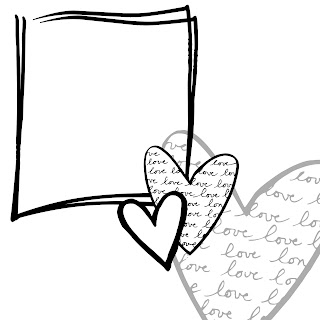
Below is acetate - feel free to print it and use it!


No comments:
Post a Comment