Showing posts with label discount scrapbooking. Show all posts

Friday, December 04, 2009

With All my Heart- Debbie


With All My Heart
by Debbie Nicholas

My Minds Eye Abbey Road Stomp double dot Cardstock
White Double Dot cardstock
Orange Bazzill cardstock
My Minds Eye Buttons
Fancy Pants Rub ons
Ink the edge of your Stomp cardstock and cut your white double dot to fit inside the patterned section. 5.5x11 inches approx.
Cut the orange cardstock 4.5x11 inches and edge with a double dot punch.
Cut another strip of the white double dot cardstock 1inch wide and place just above half way on the layout.
Use your rub on sentiments to place the title on this section.
Cut 2 photographs 4x4 and place at the left hand side of the layout.
Outline with Fancy pants rub ons and decorate the right hand side with another larger rub on and buttons.

Thursday, December 03, 2009

Rachel- Life is Out There


Life is out there
by Rachel Burgess

SUPPLIES
Basic Grey 12x12 papers (nook and pantry: waffles & bundt pan)
Ki memories daisy spot patterned paper
Corrugated card
String
Photograph
Stapler
Brown ink in spray bottle
American crafts anywhere pen (black)

HOW TO
Tear a strip of bundt pan paper and a mountain from the daisy paper and layer using the waffles paper as your base.

Spray the edges of your layout lightly using the brown ink

Tear and curl the edges of your photo and attach on the right hand side.

Punch holes along the corrugated strip, thread with string tying the ends over the photograph.

Add you text using black pen

Wednesday, December 02, 2009

Zarah- Best Friend


BEST FRIEND
by Zarah S Peterson

Supplies:
Bazzill white (and black, if you prefer to mat the photo twice "manually". I matted mine in Photoshop.)
Patterned paper (misc. manufacturers)
A journaling spot from MME (Abbey Road), packaging from Prima  and a printed tag from a top I bought
Lace
Staplers
Raindots, bling and Glossy Accents (by Ranger )
A headlines set by Doodlebug
Alphas by Making Memories and October Afternoon
Black and white pens

How to:
For this LO I simply placed the photo to see how big the papers needed to be (the photo's not standard size). I used scraps too, and this is agreat way to get a nice-looking LO from scraps and re-purposed items.

1. Cut and tear the patterned papers. Make one smaller than the other. You only need a tiny piece of the pink - just enough for the sticking-out-pieces and a little strip to fasten on the back of the yellow paper.
2. Place the prima packaging, the lace (staple that one down) and the journaling spot. Adhere the photo. Cut the clothes tag and place that under the photo, sticking out on either side.
3. Add title and journaling. I opted for just name & date. No special story - just a photo I love.
4. Place the bling, raindots and the dots of Glossy Accents.
5. Draw highlights on the title & the heart (that one's on the headlines set).
Done!

Tuesday, December 01, 2009

jess- enjoy card

This card was made to go along with a scrapbook basket I donated for a raffle.  It's a quick and easy card that is suitable for any occasion.


Enjoy
by Jessica

SUPPLIES
paper:  Making Memories "Just Chillin" paper pad girl
ribbons: Making Memories "Flower Patch"
letters:  Making Memories
felt:  Fancy Pants
flowers:  Prima

Saturday, November 28, 2009

Emma- School Book

Fancy Pants school book
by Emma Trout


Supplies list:

Fancy Pants boxed chipboard book and chipboard shapes
Bazzill cardstock
Patterned papers:
Rusty Pickle (Pop Star) Mikey, Monique, Emily, Lucas, Corbin, Cole
Chatterbox (Artylicious) black chipboard frames
Basic Grey chipboard mini monograms
Heidi Swapp chipboard stars
Making Memories texture tape
Ranger alcohol inks
Tattered Angels Glimmer mist (Key Lime Pie, Turquoise)
Jenni Bowlin chalkboard alpha (Black)
Zutter bind-it-all
Big Bite
Embroidery floss, acrylic paint, Ribbons,

How to:

Before you start, cut along the spine of each page to separate the pages.


Front cover:
Cover the chipboard with patterned paper. Draw around the chipboard bracket shape and cut the chipboard page. Paint two brackets with black acrylic paint, allow to dry, and then glue one on the front cover. Cut shapes from Rusty Pickle paper and add to cover. Paint chipboard shapes with acrylic paint and glue to cover when dry. Finish by adding title.


Page 2 (Blue page)
Cover chipboard with blue cardstock. Add the second painted chipboard bracket. Dry brush acrylic paint in the centre of the page. When dry, add patterned paper strips and shapes cut from papers.
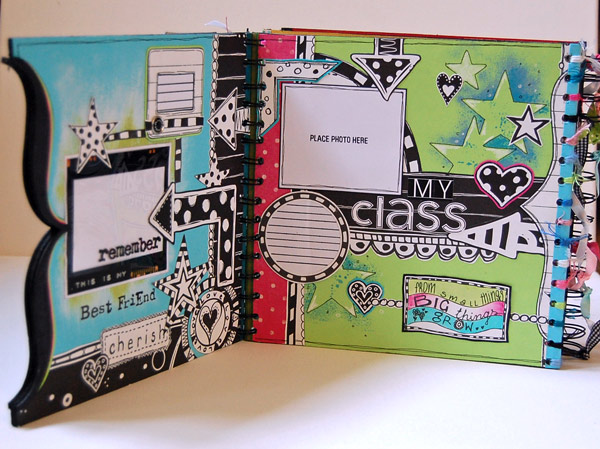
Page 3 (Green page)

Cover chipboard page with green cardstock. Place Heidi Swapp chipboard stars across the page and use as a mask to sponge acrylic paint onto cardstock. Draw around the inside of the bracket shape onto lined paper and add to page. Add patterned paper strips and shapes as desired. Colour in quote using Glimmer Mist as watercolour.


Page 4 (White page)

Cover chipboard page with white cardstock. Spray with Key Lime Pie and turquoise Glimmer mist. Draw around the mini monogram numbers onto white card, overlapping as you work. Colour around the outside of the monograms with coloured pencil and add to page. Add chipboard frame, slide mounts, patterned paper strips and shapes and title. Finish By using Glimmer Mist as water colour over title.


Page 5 (Black page)

Cover page with black cardstock. Dip an old paintbrush into acrylic paint and splatter over page, using three or more colours. Draw around monograms onto white card, overlapping as you work then add to page. Colour the inside of the monograms with coloured pencil. Add patterned paper strips and shapes. Colour in some of the patterned paper elements as required. Add page title.


Page 6 (Pink Page)

Cover the page with pink cardstock. Apply acrylic paint to bubble wrap and stamp onto cardstock. Add patterned paper strips and shapes. Add monograms drawn onto white card, cut out then coloured in with coloured pencils. Make a Christmas tree by using the arrow heads on the patterned paper, overlapping three together and adding a thin ‘trunk’. Colour in the dots and add Diamond Glaze to enhance and resemble baubles. Embellish as desired.

Finishing the book.

Bind the edges of the page. I used Making Memories adhesive tape dyed with alcohol inks (Very quick and effective to do). I also used thin strips of Bazzill to suit.

Punch a strip of scrap card with the Bind-it All. Use this strip as a template and mark the holes on the page edges. Punch the holes using the Big Bite. Align two pages together and bind with the Bind-It-All and wired. Align this with another page and thread embroidery floss through the holes to join together. Repeat as necessary until you have formed a concertina book.

Finish by adding ribbons to the wires and painted chipboard pieces threaded onto the spine as charms.

Friday, November 27, 2009


Goldilocks
by Kirs de Ven Smit


SUPPLIES
Paper : October Afternoon - Gazebo - Walk in the Park-
Embellishments: Heidi Swapp ringtone - tab - flower (a gift from scrapfriend)
Letters : chipboard  and Doodlebug design cardstock stickers Hopscotch
Heidi Swapp rhinestones
Flower : a selfmade gift from the scrapfriend
Ribbon
Prima Marketing Clear Stamp

HOW TO
The edges of the Gazebo scrapbookpaper are edited with the clear stamp. The stamp is great but there is used only the lower part of the stamp. Even with this stamp, the chipboard letters are edited. So you get a match effect.

Past the ribbon along the edges . Tear off a piece of paper from Walk in the Park, this little slice right in the middle. Then paste the picture. Edit them further with embellishments. The deer was reduced copied from large deer and colored it with the brown marker.

If you look closely, you see the little birds on Walk in the Park-paper. These are bigger copied by hand, on Gazebo paper.

Thursday, November 26, 2009

Love Set Cards- Debbie


Card Set
by Debbie


Supplies used:

Imaginisce Love rub ons
Martha Stewart Double dot punch
Swiss Dot cardstock - white

HOW TO
Cut the Abbey Road paper to the size of your card.

Punch a strip of white double dot cardstock with an edging punch and position at the bottom third of the card.

Cut a 1 inch strip of the same paper and use the other side for the different pattern, place this on top of the white cardstock.

Place sentiment rub on at the left hand side.

Place 2 Heidi swapp flowers ontop of each other, embellish with a button and ribbon and fasten to right hand side of your card.

Saturday, November 21, 2009

Karin- Dino Mini Album


Dino mini album

by Karin Kreijen

SUPPLIES
My Mind's Eye Abbey Road collection paper
Love Elsie paper
Love Elsie alpha
Dino Stamp Pink Paislee
Love Elsie Fabric Paper
Love Elsie Epoxy Stickers
Love Elsie chipboard stickers
tag Cosmo Cricket Happy Camper
paint dabber green
black and white markers

HOW TO
First make a little harmonica book or hand make it with paper. Cover the outside and inside with blue paper colors and paint all around the corners to make frames for each page.

Then the outside of the book:
1) use a black marker to frame it and the inside with a white marker..
2) The cover of the book.. cut out some piece of elsie love paper and glue it in the middle. Take a border sticker of love elsie line and put near the piece of paper.  Add a sticker arrow and put it somewhere you like on the page. Pick the love elsie alpha and stick the title down there.. I put a tag sticker on the collage of elsie paper and stamped some dino on the fabric love elsie paper and cute it out and stick it on my tag and colord him and some doodling hearts..
3) then the next page you make a photo frame from abbey road papers take two different kind of papers for more dimension, and cut out two big dino´s out of the paper abbey road and glue them on your first page, finishing touch some elsie stickers.
4) The middle page I use some tag from cosmo cricket, again with a round sticker tag from sassafras lass. And stamped again on the same paper the dino´s and put it on the tag..
5) then I made a photo frame flip over with another dino (put there with 3d foam tape,) and some more elsie expoy stickers and the inside of the flipover.. I did again a photo frame and chipboard love elsie buttons and the tale of a dino and there you have youre own dino mini album to be given away or to hold it…

Friday, November 20, 2009

Emma- Textking


Textking – Emma Trout

Supplies:
Bazzill cardstock (white)
Patterned papers:
7 Gypsies (Victoria) Walker, Rosewood
October Afternoon (Cherry Hill) Cookie Jar
My Minds Eye (The Spider’s web) Toil and Trouble
My Minds Eye (Ooh La La) Get in line, Die cut sheet
Sassafras (Bungle Jungle) Stampede
My Minds Eye (Colorful Christmas) Winter Wonderland
Imagination Project (Office supplied) Great grid paper black
Rub ons:
Luxe Designs rub-on stitches
Ki Memories fresh designer icons
Basic Grey (Wholy Cow) Paint, white
7 Gypsies (Fortunes Numero) Rubbings
Other (Unkown)
Jenni Bowlin (Kindergarten alpha) Black, Turquoise
Jenni Bowlin (Old school alpha) silver
Stampers Anonymous (Tim Holtz collection) Spills&Splatters stamp
Tattered Angels Glimmer Mist (Key Lime Pie, Patina)
Heidi Swapp ‘Love’ stamp
Heidi Swapp Journalling sticker
Stazon (Dove gray)

How to:

Stamp the splatter directly onto your cardstock.

Draw around alphabet stickers with black pen then paint around them using Glimmer Mist. When dry, apply paint rub-ons to distress then add rub-on lettering.

Add patterned papers across the bottom of the layout, layering as you work. Add triangles and strips of patterned paper around the layout, the photo and further splat rub-ons.

Use the Heidi Swapp Love stamp to stamp the title. Mask off letters of the word when applying ink, remove the mask and stamp. This allows you to stamp individual letters to create your own word. Finish the title and add the journaling spot.

Thursday, November 19, 2009

Kirs- Sweetie


Sweetie

by Kirs de Ven Smit
SUPPLIES
Paper : Basic Grey Infuse collection - Instill - Spice - Invest - Breathe- Suffuse
Embellishements : Heidi Swapp butterfly - Heidi Swapp rhinestones - Creative Imaginations
felt ribbon leaves and branches
Letters : American Crafts Thickers Daiquiri pink
Red glitter powder

How to :
Cut the flowers of paper Breathe. Everything that has red, embellish it with the red glitter powder.

Cut 4 strips of paper Invest, put it on all sides, approximately 1.5 cm from the edge.

Tear a piece of about 18 to 20 cm from Suffuse paper. Paste the picture in the upper left corner. Edit the edges with ribbon branches felt (on the white lines).

Cut a curved piece (with 2 x brown on both sides) from Instill paper. Also cut a piece but only the green part. Then cut the flowers. Then paste them together with 3D tape and flowers with a glue, crossed on the underlying flower. Paste the rhinestones on the flowers. Paste this strip about 3 cm below the picture. Edit the lower right corner with the cut flowers, leaves, felt leaves, and a butterfly. One flour paste a strip just below and slightly over the other. Stick the letters on the waves.

Wednesday, November 18, 2009

Debbie- Rock On!


ROCK ON!
by Debbie Nicholas


SUPPLIES
Bazzill Orange Cardstock 8.5x11
Cream Cardstock (cut slightly smaller than orange to create border)
White Double Dot cardstock
Abbey Road Patterned paper
Abbey Road Cardstock sentiment 
Circle punch

HOW TO
Base your layout on the cream cardstock.

Place a strip of the Abbey Road Cardstock along the bottom of your layout and above it use the other side to create another section. This should be edged with the border punch.

A thin strip of co ordinating paper should be placed over the top of the join. ink all edges.

Place photograph on the left hand side of the layout.

Punch out semi circles from the edge of your layout and add them to different places on the layout to add dimension.

Place your cardstock sentiment and journalling at the right hand side and mount the whole thing onto the orange cardstock. Ink the edge. Name and Date your layout.

Tuesday, November 17, 2009

Zarah- Love Forever


LOVE FOREVER

By: Zarah S Peterson


Supplies:
3 wallet size photos, matted on white cardstock, or matted before printing
white cardstock from Bazzill
Patterned paper: Backside of Everyday Favourite Shirt/MME, a strip of a green paper (Boo to You) from My Mind's Eye, Mulberry Road/Fancy Pants , a strip of Lizzie Geometric Flower for the peek through at the top, Ruby Polkadot Stripe/Making Memories  and a piece of Abbey Road/My Mind's Eye (front and back) for the circles.

I used a scalloped Bazzill as a template for the scallops on the Mulberry Road paper and a Whirleybird/Friends Forever by MME as a template for the shaped papers. (I cut one the same size, and one just inside that).

There's also a journaling spot from My Mind's Eye as photo mat on the middle photo.

Tools: Edge scraper/scissors, Fiskars edge punch

Alphas: Thickers from American Crafts and letter stickers from a Doodlebug Inc headlines.

Embellishments: buttons, glossy accents (or other glue that dries transparent), fluid chalk/ink for the edges, a brown pen for the faux stitching, a month-spot, a "cherish-plate", pins, lace, brads, a piece of lace, a piece of ribbon, string, a cardboard button, white flowers, raindots and a shiny heart from the local toy store.

How to:

1. Shape cut the two papers. One slightly smaller. (Rough up & ink all edges if desired.) Mount them on top of the Bazzill, and push them to the right. The bottom paper stuck out a little, which I cut off. Rough up the Bazzill and tear one bit open. Add a piece of paper underneath the tear.

2. Trace the scallops on the blue paper & cut that out. Tear the lower edge. Mount on top of the two shape cut papers. Punch out the scallops on the green paper and add that. (Rough up & ink all edges if desired.)

Adhere the lace and the ribbon on top. Fasten with brads for extra secutiry & a nice finish.

3. Mount the photo on the journalingspot and then add them all to the layout.

4. Embellish with die cut or hand cut circles, flowers and buttons. Add pins, the title and a written journaling spot (I used a piece of a journalingspot that I cut as a circle and then tore a piece off of.)

Add the pins, raindots and glossy accent dots.

5. You're done! :D

Sunday, November 15, 2009

Wendy- Explore NYC


Explore NYC
By Wendy Morris

SUPPLIES
American Crafts
Creative Imaginations
Circle Punch – 1” 
Ink
Cardstock – Prism
Ribbon – Red w/ White Polka Dot
Fabric Words Tabs – 7 Gypsies – Discussion
Red Sticker Labels - Fontwerks
Rubons – Scenic Route – Vacation, 7 Gypsies – Elements Stitches
Buttons – Autumn Leaves
Crop-a-Dile
Eyelet Template – The Crafters Workshop – Dots & Circles
Stamps – Clearly Wordsworth, 7 Gypsies
Maya Mist – Gold Metallic MST033
Pencil
Masking Tape
Glue Dots
Staples

HOW TO

Spray Maya Mist – Gold Metallic as desired on page. I misted a little heavier in the bottom right corner for title placement area. Allow to dry.

Crop photos & place photos as desired on layout.

Take Eyelet Template and decide which eyelet circle desired (Note: Keep in mind that you will place a folder circle sticker in the middle as shown, so choose a size that will be large enough). Use Eyelet Template as guide to lightly mark holes with a pencil where you will punch your holes. Punch holes with Crop-a-Dile. (Optional: You can put eyelets or brads in the holes if desired.) Apply Creative Imaginations Circle Label inside with the other side folded to back of page as shown.

Above the photo on the right, cut American Crafts paper 1” x 4”. Attach Fabric Tag to edge of paper as shown. Then, attach paper approx ¾” above photo as shown. Apply 7 Gypsies numbers rubons next to Fabric Tag. Cut Red w/ White Polka Dot Ribbon to approx 4 ¾” and attach with staples below American Crafts paper. Adhere a piece of Masking Tape as an eclectic touch. Next to left side of photo, stamp one circle of choice from 7 Gypsies stamps. Below the circle, apply stitches from 7 Gypsies rubons. Attach with glue dot Autumn Leaves button inside circle. Stamp two more circles to the right side of photo as shown. Punch 1” circle from Basic Grey paper and place inside top circle. Apply icon from Scenic Route rubons inside bottom circle. Under the photo apply “explore” rubon from Scenic Route rubons. Apply “nyc” from American Crafts Thickers. Apply American Crafts Fabric cityscape as shown.

Under the photo on the left, apply Fontwerks sticker label. Write/stamp phrase of choice inside label.

To the left side of photo, stamp one circle of choice from 7 Gypsies stamps in the center. Apply icon from Scenic Route rubons inside. Apply two Creative Imaginations Circle Labels above and below stamped circle.

Friday, November 13, 2009

Karin- Fall Card


Fall card
by Karin Kreijen

SUPPLIES
My Mind's Eye paper
Cosmo Cricket
October Afternoon
Basic Grey
Alpha Sassafras Lass
Stickers Cosmo Cricket
Overlay Hambly
ribbon American crafts
stikcer tag Hambly

HOW TO
1) Choose the size of your card. This one is a double cut out of hand.  Then take a little piece of paper from the Cosmo Cricket and one strip each of Basic Grey and October Afternoon and glue it on the front.

2) Cut out some pieces of Hambly overlay and put it on the card, then add a piece of ribbon.

3) Put the hambly tag sticker in the middle with some little button stickers on it and the owl of cosmo cricket on the right. Add a title and your card is finished.

Wednesday, November 11, 2009

Rachel- Latern

Halloween is over, but this project can be adapted to fit any of the upcoming holidays or even be made for general decor purposes!


Trick or treaters lantern
by Rachel Burgess

My Minds Eye spiders web trick or treat paper
MME spiders web witches lace paper
MME coastal glitter alphabet (container only)
Basic Grey eerie element stickers
Pink Paislee twilight collection borderlines clear stickers
Orange gems
Battery operated candle
Ranger stickles crystal & orange
Orange-brown inkpad
HOW TO
Empty the alpha tin and carefully peel al the labels away. Clean if necessary

Attach the borderlines sticker around the tin at the base.

Attach one of the border stickers from the errie elements sheet around the middle.

Use a craft knite to cut the windows away from the haunted house sticker and place over the central border at the front of the tin. Decorate the central band with the orange gems.

Inside the tin
Cover the round disk that came out of the bottom of the tin with the witches lace patterned paper.

Place the candle on the back of the patterned paper disk in the centre and draw around it. Cut out with a craft knife.

Cut a 2 inch wide strip of witches lace paper and wrap around the candle. Stick the end down and slide the candle out.

Cut half inch slits 1cm apart around one edge of the paper tube you have created and the slide the tube through the hole in the paper disk with the slits on the underside. Open the slits out and stick firmly on the back of the disc.

Fringe the top of the paper tube which is now sticking up through the hole in the paper disk and curl the fringed edge over. Attach this piece into the bottom of the tin to form a candle holder.

On the lid

Peel the label from the lid and use as a template to cut a disk of trick or treat paper. Ink the edges and edge with the orange stickles.

Attach the witch and moon sticker using sticky foam and edge the moon with the crystal stickles.

Allow to dry and then attach to the lid.

Switch the battery operated candle on and slide into the candle holder before replacing the lid.

Sunday, September 20, 2009

Debbie- Air Traffic Control

Air Traffic Control
by Debbie Nicholas


SUPPLIES
Imaginisce Lets Roll - Lets Go Paper
Imaginisce Lets Roll - Choo! Choo! Paper
Imaginisce Lets Roll - Stop and Go Paper
Imaginisce Lets Roll - Rub ons, Acrylic Stickers
Plain chipboard alphabet letters
We R Memory Keepers woodchip sentiment

HOW TO
1. Cut a 6" strip of patterned paper and lay it so that there is a gap at the bottom of the page to see the background.

2. Cut a semi circle from the dotty paper and place this in the centre of your layout.

3. Cut a 4x10" strip of the worded paper and lay this at an angle at the right hand side.

4. Place photograph words and rub ons onto the layout and journal the date in the bottom corner.

Saturday, September 19, 2009

Karin- Having Fun

"Having Fun Mexx my boy"
by Karin Kreijen
SUPPLIES

My Mind's Eye paper
Prima Donna leftovers
October Afternoon paper
Sassafras Lass paper.
some stickers
Jenni Bowlin tag ticket
Hambly sticker tag
Black pen

HOW TO
Step 1:  First I cut out the red My Mind's Eye paper and then the lighter one..

Step 2:  Use some black marker to make stripes and doodle some hearts on the photo.

Step 3:   Glue down the picture (13x18).

Step 4:  Put a piece of October Afternoon Bingo paper under it and some prima donna cardstock under the picture.

Step 5:  Add stickers to your layout and line up your title.

Step 6:  Add some sassafras under the picture with a stampler and you have you page that is done very fast and simple

Friday, September 18, 2009

Under Cover- Stephanie

Under Cover
by Stephanie Garbett
SUPPLIES
card stock bazzill
patterned paper dcwv
prima bling flowers letters stamp
doodlebug ribbon
making memories photo corner

HOW TO
1 start off by cutting the pink patterned paper into a square then tear as shown

2 cut another square smaller than the one before glue into place and place photo ontop

3 using different patterned papers cut different sized strips cutting the edges for more effect and glue into place as shown

4 add the ribbon to give this more texture using another strip of patterned paper pleat to make a circle then glue this to the bottom right of the photo as shown

5 add title stamping and the rest of your chosen embellishments

6 Finish off by doodling a border to the outside of the white card stock

Wednesday, September 16, 2009

Kirs- Be Nature

Work with Making Memories Dye

"Be  Nature"
by Kirs de Ven Smit

SUPPLIES
Making Memories Scrapbook Dye Wheat (outlet shop)
White cardstock , textured
Doodlebug Velvet paper white
Big tag
Basic Grey Chip Sticker Shapes
Journaling Tag (outlet shop)
Sizzix Flowers & Vines, Bird w/Leaves & Flower

HOW TO
You can use the Making Memories Dye in many different ways. You can use them for various embellishments such as Making Memories flowers, ribbons, paper, fabric, etc.

Make the dye according to the description and use the tweezers or gloves.

Now I want something else to try to continue working with a regular card stock paper and felt. It worked well and I like to share with you.

Take white card stock and a sponge (see photo 1.). I've used an ordinary scouring pad and cut them into about 2 cm width. Dip them into the ink and spread them out on card stock in the vertical lines. For darker shade, reapply the ink. Pick a broad brush to drop stains, dip them in the ink and give tap to the brush just above the paper. So you get a nice paper with a wood pattern! Just a parquet floor.

Now with velvet paper. Take a broad brush and dip it in paint. Just above the paper (watch out for splashes) with the brush between your thumb and fingers take (possibly use glove) and make a range of movement with the brush, so you get splashed. Try it first on another paper.

Then with the dryer for drying, velvet slowly dries. In this paper, I have punched out a bird, flower and branches with Sizzix.

I also tried them on a patterned velvet paper.  It is well managed, only you must be very careful when working with the velvet.  Use small amounts of ink on the sponge and be very brief and just pull fast over the patterns. Then it goes well. Otherwise the ink will begin to blend with the paper and you won't see the patterns any more. See also the photo.

Tuesday, September 15, 2009

Jessica- Boot Camp


SUPPLIES
Patterned Paper:  Bo Bunny Mango Luau
Cardstock:  Bazzill
Alphabet Stickers:  Bo Bunny
Bo Bunny Mango Luau Buttons and Bling
Ribbon:  American Crafts

HOW TO
The flowers are made by cutting various sized circles.  First fold the circle into quarters.  Using the two bottom quatrants, fold upwards, making a petal shape.  Flip the circle to the other side.  Folding the same bottom quadrants, fold the petal inward towards the middle.  It is kind of like folding  a paper airplane.  Use curled pieces of thin cardstock for the middles.  Handcut stems from cardstock and make an arrangement of your folded flowers and tie a ribbon around it.  I stuck a pin I received from the US Army after my husband graduated from Boot Camp which says "Army Spouse."  I've accumulated a few of these over the years and thought it would be an appropriate way to use one.  The background is simple; various sized patterned paper squares layered over one another, fitted on top of a scalloped piece of Bazzill paper.