Showing posts with label quickutz. Show all posts

Sunday, March 22, 2009

Moniek- Doodlebug

Hoera card
by Moniek Jannink

SUPPLIES
Paper: Doodlebug Cherry – pie plaid
Doodlebug Cherry – Cobbler
Doodlebug Cherry – Amore
Cardstock: Bazzill white
Doodlebug Cupcake crushed velvet cardstock
Circle punch
Embroidery floss
Quickutz Studio

HOW TO
This is a quick and easy card and a perfect way to use your left overs!
Again used my Quickutz to cut out letters from the velvet cardstock…… my new favorite thing!!

Wednesday, March 18, 2009

Moniek- Doodlebug


So Sweet
by Moniek Jannink

SUPPLIES
paper: Doodlebug Cherry - Cobbler
Doodlebug Cherry - Amore
Cardstock:
Doodlebug Cupcake Chenille cardstock
Doodlebug Cupcake crushed velvet cardstock
Doodlebug BonBon crushed velvet cardstock
Bazzill Limeade
Stickers: Making Memories - Defined stickers
embroidery floss
Quickutz Studio Skinny Mini and classic
Quickutz Silhouette

HOW TO
I used my Quickutz to cut out letters from the Chenille cardstock and the result is just amazing. you can create letters which look like the American Crafts Thickers!
You need to squeeze your Quickutz a little more when you use the Chenille cardstock, but you will get some awesome lush letters!

Monday, January 05, 2009

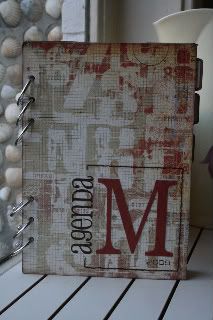
Moniek- 2009 Agenda


2009 Agenda
by Moniek Jannink

SUPPLIES
Paper: Basic Grey – Recess "Principal," "Classmates,"
Cardstock: Bazzill Kraft
Alphabet stickers: Mustard Moon – cardstock stickers brown
Embroidery floss
Several stamps
QK Silhouette
QK tab die
Circle punch
Crop-a-dile
Chipboard
6 binder rings

HOW TO
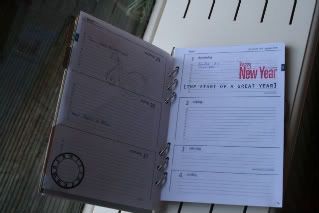
I bought a 2009 filling for an agenda planner with 1 week on 2 pages and made the cover of 2 pieces of chipboard. The cover and pages measure 20 x 15 cm.

I embroidered a frame on the front cover and used the Mustard Moon letter stickers to make a title. I cut the large M with my silhouette.

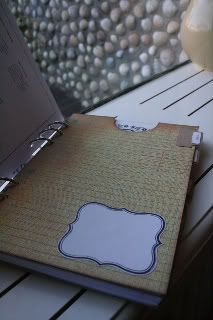
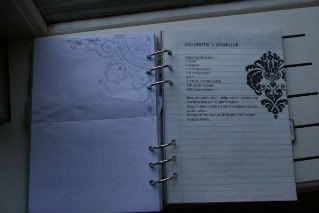
I have made several sections in my diary for keeping notes, recipes, scrapbooking inspiration etc. I folded a piece of basic grey paper (20 x 30cm) in half, fold to the rights side, holes in the left side and glued the bottom together in order to make a pocket in which I can keep several memorabilia. I included some writing paper and embellished the papers with stamps.

Wednesday, November 05, 2008

Moneik- **OCTOBER AFTERNOON**

Inspired by Ali Edward's, Moniek created an album in advance so she can easily document the activities, stories, and photos that December will bring. "My album starts on December 10th, since in the Netherlands we celebrate Sinterklaas on December 5th and I usually start with our Christmas planning, decorations etc after that. My album ends on December 27th ."


Christmas Album
by Moniek Jannink


SUPPLIES
Paper: October afternoon Good Cheer- Falling Snow/Tinsel/Sugar Cookies/Peppermint Sticks/ Gingerbread/Sleigh Bells
Cardstock: Bazzill – Cream Puff/Hillary/Pomegranate
American Crafts Thickers: Vera Vinyl letter stickers – white
Daiquiri
Tinsel accents – foil shape stickers – silver
Leg warmers – felt letter stickers – white
Pajamas – felt letter stickers

Making Memories clear stamps – journal
Basic grey clear stamps
Quickutz – studio Classic and skinny mini
Red envelope
Making Memories clear creations – family
Zutter Round it all
Red Embroidery floss


The size of the album is 24 x 14 cm and the pages have all different sizes from 15 x 13 cm to 21 x 13 cm.

Friday, September 19, 2008

Mireille and Moniek- **MY MIND'S EYE**

Today we have two layouts focusing on summer traditions. The first comes from Mireille. "Every year we take pictures on top of the Fort in Pula. Years ago it was just pictures of me. Then pictures of me pregnant. Later it was pictures of me and Amber, then pictures of Amber and me during my second pregnancy. Last year we had someone else with us to take the pictures and then all four of us were in the picture. It became a true tradition to have our pictures taken at the end of our holiday. To bad that this beautiful tradition came to an end. This year again we took someone else to take the pictures and found out the fort had been sold. There were big closed gates and no way we could climb on top to take pictures. For the first time we took the pictures in front of the fort in stead of on top."


Summer tradition
by Mireille Divjak

SUPPLIES
Cardstock: Bazzil
Patterned paper, Rubon titles, rubon alpha's , transparency and rubon swirls: My Minds Eye
Ink: Stazon
Stickles: Ranger
Buttons: Foof-a-la
Ribbon: chatterbox
tag: quickuts
pen: Sakura

HOW TO
I used 2 sheets of patterened paper and 3 sheets of cardstock for this layout. Cut out a large flower out of cardstock and one out of patterened paper. Distress the edges with Rangers distressing tool. and outline with Stickles. Adhere the flowers to the background sheet. Adhere the picture on yellow cardstock and cut a scalloped border (I used the edges of my fiskar circle cutter which has a scalloped pattern. )
I used MME rubon titles and rubbed them on cardstock. Cut them in a rectangle and a tag, then distressed the edges and inked them. Cut a hole with the crop-a-dile in the tag, cut edges out of the transparency and adhere them with clear glue to the tag. Tie a ribbon through the hole and add a mini tag.
I cut out flowers out of the patterned paper, crumpled them and adhered them with gluedots for dimension. Add buttons. Take four clear buttons and rub the initials of your family members on the button. Adhere with a gluedot. Print journaling on your cardstock and cut it into strops. Outline with a black pen and decorate with mini flowers cut from the patterned paper

Our second project is from Moniek. "On our summer vacations, I usually buy my kids a disposable camera for them to take their own photos. And I found out that it is awesome to see our vacation through their eyes. They take pictures of stuff I never would choose to photograph! I keep all their photo’s, even the blurry ones, because I love them all. I have put them together in a small album and put some of my journaling in between."


Bette's Summer Vacation Photos
by Moniek Jannink

SUPPLIES
Paper: MME Garden Party – My sunshine sunburst stripes / my sunshine lazy days / my sunshine sunny days
Cardstock: Bazzill – pinecone / cream puff
Clear Stamps: Making Memories – journaling / Hampton Arts
Brown and black ink
Black Stazon ink
Quickutz Studio skinny mini
Ribbon

HOW TO
I have used a very old SEI album I had in my stash for years and covered it with MME garden party.
Ink all the edges of the papers with brown ink.
Adhere ribbon on the front of the album.
Print part of the title on cream Bazzill and then stamp jounaling stamp on top. Handcut journaling stamp and adhere to front of the album.
Handcut 2 flowers from the Lazy Daisy papers and use them as two 0’s
Use QK to make letters and adhere these to the front.
Use the Hampton Arts stamps to embellish your album.
The SEI album comes with 4 x 6 page protectors and I stamped on the pageprotectors with Stazon Ink in order to embellish some of the pages. I also adhered some stamped and handcut journaling spots on top of the pageprotectors for journaling.

Sunday, September 14, 2008

Moniek- **BASICGREY**

Today we have a few cards and a pillow box from Moniek featuring BasicGrey's Ambrosia line.


Card- Happy Birthday to You
SUPPLIES
Cardstock – Bazzill apricot
Paper – BasicGrey Ambrosia – tangy / chutney
Rubons – BasicGrey Wholy cow! – BEL493 / BEL 268 / BEL277
Stickers – BasicGrey Ambrosia Element Stickers
Organza ribbon
Brads
Embroidery floss
Cornerrounder
Brown ink
Fiskars scalloped border punch


Card Merry Xmas
SUPPLIES
Cardstock– Bazzill pomegranate
Paper– BasicGrey Ambrosia– tangy / orange smoothie
Stickers– BasicGrey Ambrosia Element Stickers
Letter stickers- BasicGrey– vagabond letters
Label- BasicGrey clear stamp
Organza ribbon
Brads
Embroidery floss
Brown ink
Glue pen
Glitter
Corner rounder

Happy Birthday 2 U

SUPPLIES
Cardstock– Bazzill Apricot
Paper– BasicGrey Ambrosia - fresh squeezed / zest / rind /citrus / tangy
Rubons– BasicGrey Wholy cow! – BEL498
Stickers– BasicGrey Ambrosia Element Stickers
Label- BasicGrey clear stamp
2- Quickutz Studio Skinny mini
U- handcut
Fiskars scalloped border punch
Brown ink


Pillow Box Thank You So Much

SUPPLIES
Paper- BasicGrey– pome/fresh squeezed/winsome
Stickers– BasicGrey Ambrosia Element Stickers
Label- BasicGrey clear stamp
Glitter
Glue pen
Bling
Brown ink

Friday, August 22, 2008

Mireille- Candy Box **SCHOOL TIME**

For some, school is right around the corner. For others, their children have been in for a while already. For the week, we will be showing you some wonderful school based projects. Some will be gifts for the teacher (like today's project), some are layouts about the first day of school, and another will be about the job of a teacher. Stick around and see what we have for you!


Here is a quick little candy box project you can make for your child's teacher.


Candy Box for Teacher
byMireille Divjak

SUPPLIES
Candybox: Bare Elements- Creative Imaginations - John tri favor box
Patterned paper: Luxe Designs- Tricket line
Hearts: Heidi Swapp
Bling: My Mind's Eye
tags: Quickutz

HOW TO
This is really quite simple: cover the small box with patterned paper, decorate it with two hearts which have been outlined with a black marker.
Add a rhinestone and two tags. Mine say, "from Amber to teacher Anita."
Don't forget to put some yummie chocolate inside.

Sunday, August 10, 2008

Lucy- Mini Pianist Me **MONOCHROMATIC**

Our poor designer Lucy broke her hand a few days ago! Lucky for us she sent this gorgeous monochromatic layout before the horrible event happened. On this layout, Lucy only used one color of cardstock to create a self-named "ghost emboss." Be sure to read her how to and learn this really cool technique.


Mini Pianist Me
by Luciane Folch

SUPPLIES
Bazzill Cardstock
American Crafts Remarks journaling sticker
American Crafts slick pen
Miscellanious buttons and brads
Any Die-Cut machine

HOW TO
You'll need at least 3 sheets of the same color. I used lime green, however you can choose any color you like.
Start by cutting a piece of your background 5 cm long and 5 cm high.
Then get another sheet of cardstock of the same color and cut strips of 5 cm.
I used my Quickuts but any punch or die-cut machine will work.
I used some hearts to make a border.
Then I cut some flowers and circles to embellish.
All in the same shade of paper to create the "ghost emboss" kind of feeling...I just came up with this name...LOL
The title I used Quickutz as well.
Put it all together with some brads and buttons.
Now I dare you all to do the same, just remember do not use any other shade or patterned paper to create this "Ghost"effect.
You'll be surprised with the results!
Have fun!

Thursday, July 03, 2008

Moniek- 2 Cards


Happy birthday
by Moniek Jannink

Supply list
Cardstock: Bazzill pommegranate
Paper: My Mind´s Eye 29th Street
Mellow "Happy" Jolly Dotty / Cherry paper
Mellow "Pretty" Beautiful Blossoms / Peachy Paper
Mellow "Cheerful" Happy Stripes / Rosy Cheeks Paper

Chipboard: Autum Leaves by Rhonna Farrer . chipboard panels & icons
Alphabet sticker: Mustard Moon Cardstock Stickers - brown
Scenic Route teal date label - cardstock stickers
Happy Birthday rubon: Pebbles Inc - duplicate rubons - brown
Red organza ribbon
brown ink
embroidery floss
Date stamp


Gefeliciteerd

Supply list:
Paper: Imaginisce Baby Powder (double sided!)
Cardstock: Bazzill Parakeet and Cream puff
flower die cut: Imaginisce Baby powder collection - animal crackers
Epoxy brad: Imaginisce All kinds of happy collection - sweet treat
Label: Quickutz die cut
embroidery floss

Friday, June 20, 2008

Totally Spies Girls


'Totally Spies Girls'
by Moniek Jannink

SUPPLIES
Paper: Daisy D´s 'Cornflower', 'Butterfly Stripe.' Bazzill cream puff and pomegranate.
Quickutz - Studio Classic and Skinny mini
Shipping tag
Red emboidery floss
Red dymo tape
Foam Stamps: Making Memories- Dingbats
acrylic paint
Heidi Swapp bling
silver brads

HOW TO
Sand the edges of your photo and adhere photo to your paper.
Cut a piece of 18 x 5,5 cm and tear the left side of this piece of paper.
Glue this strip next to your photo with a small overlap and use brads to adhere through your photo.
Print your journaling directly on the shipping tag and place this tag under the paperstrip.
Use the QK to cut out the letters for the title and place the title next to the photo.
Cut 3 strips of cream cardstock (1,5 x 12 cm) and place subtitle here. Embellish with big brads.
Embroider a frame around the title and photo and make an arrow on the photo.
Cut the rest of the journaling in small strips and adhere left of the shipping tag.
Make a subtitle with your dymo labeler and adhere this vertically over your photo and layout.

Saturday, June 07, 2008

Something to make you say, "awww!"

There is nothing better than a beautiful layout featuring a newborn baby. Today Moniek shares a page dedicated to her friend's new baby, Malte. She uses the newly released "Baby Powder" line from Imaginisce.


"Malte"
by Moniek Jannink

SUPPLIES
Paper: Imaginisce Baby Powder - King of the Crib
Cardstock: Bazzill Kraft / Cream Puff / Parakeet / Starmist
Diecuts: Imaginisce Baby Powder Collection - Animal Crackers
Chipboard stickers: Imaginisce Baby Powder Collection - Sticky Kisses
Quickutz Cookie Cutter Dies - Scallops
Quickutz Studio Classic
Date stamp
sewing machine
light blue organza ribbon

HOW TO
Cut Imaginisce paper to 27,5 x 27,5 cm and center this on Kraft cardstock.
Cut a strip of 2 cm and use the striped side of this paper.
Machine stitch the edges of the Imaginisce paper.
Cut photo to 26 x 16 cm and attach to layout.
Print name on Starmist Bazzill, cut this into a strip of 2 cm and adhere vertically on your layout.
Use QK cookiecutter to die scalloped border and attach to the strip of paper and machine stitch.
Make a tag of 5 x 8 cm from Bazzill Cream Puff and machine stitch the edges.
Stamp date on this tag and attach Imaginisce die cut.
Punch 2 holes in the tag and use organza ribbon to make a small bow
Embellish your page with Imaginisce chipboard stickers and Imaginisce diecuts.

Saturday, May 17, 2008

Totally Girl

You don't always need to use a special occasion to scrap. Sometimes the simple reminders of why you love your child makes the best page.

"Totally Girl"
by Moniek Jannink


SUPPLIES
Paper: My Minds Eye 29th Street - Fancy Girly Girl
MME Fancy Girly Girl tag die cut
MME Fancy Girly Girl totaly girl title
Fancy Pants / Glitter Cuts - Tall floral
Chatterbox - decorative ribbon - olive
Heidi Swapp - Clear stamp- remember
Heidi Swapp - Bling
Making Memories - die cuts 5th Ave
Making Memories - Pebble clips / love story
Quickutz Cookie Cutter - Scalloped border
embroidery floss
brads
staples

Sunday, May 11, 2008

Happy Mother's Day from ScrapBookMate!

Today, Moniek shares a cute little mini album she made her mother for Mother's Day. It hold photos of her children. Next to each photo, she stamped a journaling spot for her children to write a small note to their grandmother.

We hope everyone has a wonderful day. Happy Mother's Day!


SUPPLIES
Paper: BasicGrey Sultry - stylish / dressy / citron / patina / delectable /
Cardstock: Bazzill: Hukkary / limeade / petunia
Flowers: Heidi Swapp
Imaginisce: Cha Ching Brads
Ribbon - Bazzill
Autumn leave clearstamps / journaling blocks
Making Memories foam stamps / dingbats
acrylic paint
Quickutz cookie cutter - scallops
embroidery floss
tie wraps
corner rounder
black ink


HOW TO
Cut pages from 1,5 mm chipboard to 9 x 13 cm. 1,5 mm chipboard can be rounded in a corner rounder, so round all corners of your pages.
Cut pages from BasicGrey paper to 9 x 13 cm.
Cut small strips of BasicGrey paper of 2 x 13 cm.
Diecut scalloped strips with Quickutz cookie cutter using Bazzill paper.
Layer flowers and big brad and attach to the paper you want to use for the front of your album. Use the same paper for the back of your album.
Glue this paper with flower to front the first chipboard page and attach ribbon to the back before you glue your photo to the back.
Glue all your BasicGrey paper to the chipboard pages and attach small BasicGrey strip and scalloped strip on the left side of your page.
Attach the photo to the left page of your album and the BasicGrey paper with stamps on the right side of your album.
First stamp with foam stamp and acrylic paint.
Let it dry and then stamp journaling block with black ink.
Punch holes with your Crop-a-Dile and bind your album with tie wraps.

Wednesday, April 30, 2008

Girls Only!

Although Mireille made this doorhanger for her daughter, it could easily be made into a gift for dear Mom. Create a "do not disturb" sign when some quiet time is needed. You can even make it for yourself to hang on your scrap room door to warn any unwanted visitors that they are about to disturb a creative flow. The options are endless!


SUPPLIES:
Doorhanger: Creative Imaginations, Bare Elements, Latynn
Rubons: Die Cuts with a View
Patterned Paper: Luxe Designs- Trinket line- Be Mine
Bling: Heidi Swapp; Junkitz (hearts) My Minds Eye (rhinestones)
Large Flower: Heidi Swapp
Preglittered Flowers: Making Memories
Small flower: Prima
Alpha's Heidi Swapp
Paint: Making Memories
Glitterglaze: Making Memories
Stickles: Ranger
Hatpin: Fancy Pants
Pen: staedler
Ribbon: Offray
Button: Foof-a-La
Glossy chipboard hearts: Heidi Swapp
Xyron- Create a Sticker
minitag- quickutz

HOW TO:
Paint the front and back of the doorhanger (3 shades of pink) by squeezing a dash of each paint onto the surface. Blend the colors with your fingers. Once the paint is dry, coat the hanger with Glitter Glaze. Cut circles from the patterned paper and layer them. This will serve as a mat for your photo. Place your photo and frame it with bling ovals. The letters were ran through a Xyron Create-a-Sticker to make them adhere. Outline the letters with a pen. Finish the project with different flowers. Embellish the top right flower with glitter, ribbon, a hatpin, and buttons. Use stickles to complete the look of your new doorhanger.

Monday, April 21, 2008

Use those Scraps!

Moniek shows us how to put scraps of paper to good use. Recycle, reduce, reuse!


"Happy Birthday"

SUPPLIES:
Paper: Basic Grey - Perhaps - Beatrice
Cardstock: Bazzill - Hillary and petunia scalloped cardstock
Chatterbox Decorative ribbon - pink
Flowers: Doodlebug (with glitter) and Prima
Heidi Swapp Bling
Making Memories Rubons mini - cards birthday
Embroidery floss
Quickutz die - tag
Button

I rubbed the MM rubon on the ribbon!


"Eat Cake"

SUPPLIES:
paper: Basic Grey - vagabond
cardstock: bazzill Kraft and jacaranda
Making Memories Rubons mini - cards birthday
Letter sticker: Doodlebug just my type black
embroidery floss
organza ribbon
Chipboard star - made with Ellison Big Shot - Sizzix die
Acrylic paint
sand paper
Circle punch
Scalloped circle punch
QK Cookie cutter die - Scallops for making the scalloped die cut from Kraft Bazzill

Friday, April 11, 2008

"Nog Net 7"

Today's layout is from Moniek and it's a touching page about the last day of her daughter being 7 years old. The clean lines and rich blues are a beautiful tribute to the excitement a little girl feels the day before she turns 8 and the sadness from a mother who feels time won't slow down.


"Nog Net 7"
SUPPLIES:
Paper: Basic Grey Cupcake - kazoo blue
Basic Grey Cupcake - make a wish
Basic Grey Archaic - prehistoric
Cardstock: Bazzill - cream puff
Chatterbox decorative ribbon - denim
Heidi Swapp - iron on words - love
Heidi Swapp - clear stamp - damask
Making Memories - brads mini silver circle
Making Memories - die cuts 5th Avenue - Sophia
Creative Imaginations - creative cafe word bits
Scrapworks - shimmer shapes
Dymo tape
Hero Arts - fancy flourishes
Quickutz - Studio Classic shipping tag
embroidery floss


HOW TO:
Sand the edges of your photo and place on Basic Grey Kazoo blue paper. Print journaling directly onto shipping tag and adhere printed tag on your layout. Cut strip from the Make a Wish paper and from the Chatterbox ribbon. Attach with silverbrads to your layout. Use your Quickutz to make title. I have also handcut the 7. Place them next to the photo. Emboider a frame around your photo and title. Cut a small strip from Prehistoric paper and place vertically over your photo. Place dymo strip right beside this. Embellish your page with Making Memories die cuts, stamps, stickers and Iron on words.

Tuesday, March 18, 2008

Bunnies everywhere!

Moniek was inspired to create this Easter layout during a recent trip to Germany. Everywhere they looked, they saw chocolate bunnies!!

Materials list:
BasicGrey papers Two Scoops - very berry sundae
BasicGrey papers Gypsy - Dali
Making Memories papers 5th Avenue - Elizabeth floral
Making Memories 5th ave - die cuts
Making Memories mini brads Garden party
Making Memories jumbo brads
Making Memories stickers
Quickutz tab die
Embroidery floss


Following on with our face to face introductions, here is our talented Moniek! Why not check out her personal blogs http://www.moniekjannink.blogspot.com/ / http://www.mjworkshops.blogspot.com/