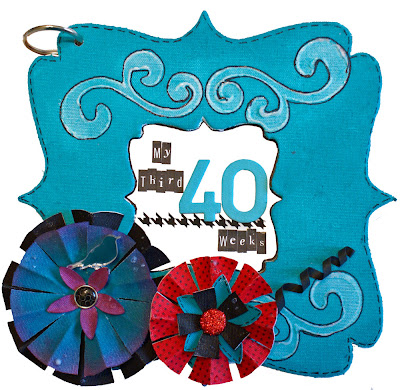


Altering a Mini Album Using Claudine Hellmuth's Sticky-Back Canvas
Designed and Taught by Jessica Summers
SUPPLIES
Claudine Hellmuth Sticky-Back Canvas
Claudine Hellmuth Studio Paints- Classic Teal, Dash of Red, Charcoal Black
Claudine Hellmuth Studio Paints- Multi-Medium Gloss
Ranger Archival Ink- Black
Foam Stamp
Sizzix Die Cutting Machine
Sizzix Die- Charms, Flowers #2
Brads for floral centers
Thin strip of cardstock
Background Stamp
Stickles
TOOLS
Craft Knife, Scissors, Crop-A-Dile, Foam Brush, Paint Brush, Ranger Non-Stick Craft Sheet, Black Pen, Strong Glue Dots, Heat Gun, Paper Towels, Water for Washing Brushes, Water for Blending.
HOW TO
1.Trace around the outer edge of your mini onto the backside of your canvas sheet; cut out and attach to the mini album cover.
2.Scoop out a portion of the multi-medium onto your craft sheet. Using your foam stamp, dab into the multi-medium until you have an even layer. Stamp directly onto your canvas. Allow to dry.
3.While the medium is drying, cut out 3 circles, each measuring: 3.5” (8,9 cm), 3” (7,6 cm), and 2.5” (6,4 cm).
4.Paint the larger circle and one small die-cut flower black and the smallest circle red. Set aside to dry.
5.The medium sized circle will have a blending technique.
1.Paint the medium flower teal, but leave about ¾ of a centimeter around the edge plain.
2.Blend a dab of red and a dab or teal onto your craft mat to make a purple shade. Water down the new color.
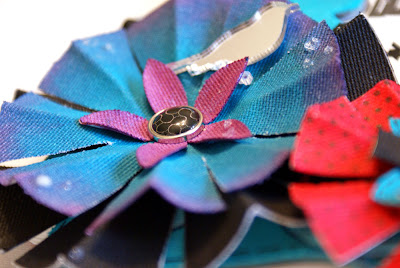
3.Using a small amount of the purple at a time, paint onto the edge of the flower and blend into the teal color.
4.Set aside to dry.
6.Paint a die-cut flower with any remaining purple, and the last flower teal.
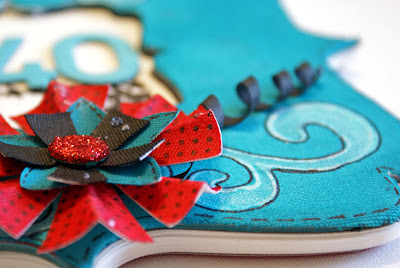
7.By now the multi-medium should be dry. Add a scoop of teal pain onto your craft mat and water down with a paint brush. Paint over your canvas to expose the medium (this technique is called a “faux batik”). With a paper towel, quickly wipe away the paint from atop the medium. Continue to paint until you achieve your desired color. Set aside to dry.
8.Stamp a background image onto your red circle.
9.Cut your circles according to the diagram provided. Once the flower petals are cut, score and fold each one in half. Leaving the paper lining on the back of the canvas will help flowers keep their shape. However, this can also be achieved by applying a coat of the multi-medium and allowing it to dry.

10.Layer your flowers, attaching a brad to the middle. Adhere to your mini.
11.As a final touch, you can add little droplets of the multi-medium to your flowers for a handmade “raindrop.”
Designed and Taught by Jessica Summers
SUPPLIES
Claudine Hellmuth Sticky-Back Canvas
Claudine Hellmuth Studio Paints- Classic Teal, Dash of Red, Charcoal Black
Claudine Hellmuth Studio Paints- Multi-Medium Gloss
Ranger Archival Ink- Black
Foam Stamp
Sizzix Die Cutting Machine
Sizzix Die- Charms, Flowers #2
Brads for floral centers
Thin strip of cardstock
Background Stamp
Stickles
TOOLS
Craft Knife, Scissors, Crop-A-Dile, Foam Brush, Paint Brush, Ranger Non-Stick Craft Sheet, Black Pen, Strong Glue Dots, Heat Gun, Paper Towels, Water for Washing Brushes, Water for Blending.
HOW TO
1.Trace around the outer edge of your mini onto the backside of your canvas sheet; cut out and attach to the mini album cover.
2.Scoop out a portion of the multi-medium onto your craft sheet. Using your foam stamp, dab into the multi-medium until you have an even layer. Stamp directly onto your canvas. Allow to dry.
3.While the medium is drying, cut out 3 circles, each measuring: 3.5” (8,9 cm), 3” (7,6 cm), and 2.5” (6,4 cm).
4.Paint the larger circle and one small die-cut flower black and the smallest circle red. Set aside to dry.
5.The medium sized circle will have a blending technique.
1.Paint the medium flower teal, but leave about ¾ of a centimeter around the edge plain.
2.Blend a dab of red and a dab or teal onto your craft mat to make a purple shade. Water down the new color.
3.Using a small amount of the purple at a time, paint onto the edge of the flower and blend into the teal color.
4.Set aside to dry.
6.Paint a die-cut flower with any remaining purple, and the last flower teal.
7.By now the multi-medium should be dry. Add a scoop of teal pain onto your craft mat and water down with a paint brush. Paint over your canvas to expose the medium (this technique is called a “faux batik”). With a paper towel, quickly wipe away the paint from atop the medium. Continue to paint until you achieve your desired color. Set aside to dry.
8.Stamp a background image onto your red circle.
9.Cut your circles according to the diagram provided. Once the flower petals are cut, score and fold each one in half. Leaving the paper lining on the back of the canvas will help flowers keep their shape. However, this can also be achieved by applying a coat of the multi-medium and allowing it to dry.

10.Layer your flowers, attaching a brad to the middle. Adhere to your mini.
11.As a final touch, you can add little droplets of the multi-medium to your flowers for a handmade “raindrop.”
ADDITIONAL TIPS, IDEAS, AND USES
- For a complete color mixing guide, visit: http://www.collageartist.com/chstudio_colormixing.pdf.
- How To Make a Glaze: Mix together a bit of paint with the multi-medium. The more multi-medium used, the more transparent the paint glaze will be.
-Print on Canvas with computer printer (not recommended for laser printers)
-Resist Technique using Ranger Watermark Resist Pad
-Sew onto t-shirts or make purses.
-Faux Batik
-Glue with the Gel Medium
-Water down colors for translucent coloring.
-Mix with Ranger Perfect Pearls: Run canvas through an embossing folder. Outline the embossed area with a Ranger Perfect Pen in clear. Dust lightly with Perfect Pearls. Mixing the paint with Perfect Pearls also gives a beautiful look.
-Works well with die cutting machines and a Bind-It-All.


2 comments:
I love this!! Can I mention it on my blog in my next linky list?
This is gorgeous! Just incredible!
Post a Comment