Showing posts with label Teresa Collins. Show all posts

Tuesday, March 24, 2009

Moniek- Pink Paislee


Girls Just Wanna Have Fun
by Moniek Jannink


SUPPLIES
Paper: Pink Paislee Captivating - Graceful
Pink Paislee Captivating - Lovely
Pink Paislee Vintage Moon - Moonrakers
Pink Paislee Vintage Moon - Moon Pie
Dymo tape
Heidi Swapp clear stamp - damask
Teresa Collins stamp - remember this
7gypsies 97% complete stickers - home
Transparency "together" Making Memories
Embroidery floss

I used the Pink Paislee lines Captiviting and Vintage Moon and I found them to mix perfectly!

Friday, March 06, 2009

Moniek- Piggy Tales


When I first saw the Piggy Tales Mulan collection with the black and red patterns I immediately thought about the soccer outfit of my son. The colors of his club are black and red!
Most of the papers have an asian print, but I used the Valiant Soldier paper with the strips..... perfect for a soccer layout of my son!

I use a Heidi Swapp 9x9 album for all soccer layouts, so this layout is 9x9.
-Moniek
Supply list:
Paper: Piggy Tales - the ballad of Mulan Collection
- Valiant soldier
Piggy Tales - the ballad of Mulan Collection Chipboard shapes
Piggy Tales - the ballad of Mulan Collection Cardstock letter stickers

7gypsies - 97% complete stickers - Document
white embroidery floss
Dymo tape
stamps: Creative Cafe / art warehouse / Teresa Collins

Sunday, January 25, 2009

Mireille- Mom You Smell So Good

Mom you smell so good
by Mireille Divjak

SUPPLIES
Cardstock: Bazzill bling
Patterned Paper: My Minds Eye - Quite Smitten (jen wilson)
*flushed floral
*lovely dots
*So in Love
*surprise bouquet
Pen : american Crafts
Flowers and leaves: Prima Marketing Inc.
Alpha's: American Crafts
Floss: Karen Foster
Stamp: Prima Marketing Inc.
Ink: Archieval - Ranger
Button: Foof-a-la
Pin: Fancy Pants
Rubons - Teresa Collins for junkitz and Karen Russel for CI
Heart shaped Mirror: Heidi Swapp

HOW TO
Distress and layer the papers. The photo and the thickers were traced with an American Crafts marker.
I used a large swirl stamp and paired leaves and a flower close to it. Used some rubons close to the journaling strips (bradley hand ITC font).

Thursday, June 26, 2008

Kirs- My Dad

Today Kirs has a fun tribute layout to her father. Check out her how to and see how she uses cardboard as a stamp on the Bazzill Chipboard! What a great idea!


My Dad
by Kirs de ven-Smit

Supplies
Luxe Designs paper – Simple Gride (blue and red)
Luxe Designs paper – Simple Dots (blue)
Bazzill Cardstock Craft
Old Paper
Doodlebug Letterstickers
Making Memories Letterstickers Puffy Alpha (blue)
Prima Marketing Inc. Scrapbooking Tape, Cleary IOD
Teresa Colins Journaling Tags
7Gypsies Label Sticker Book Bureau
Bazzill Chips, Scalloped Circle
Little piece fabric
Button
Felt
Cardboard with ridge
Uni Poscapen Red
Fineliner Black
Uni Ballpen White

HOW TO
For the stripes on the Bazzill Scalloped Circle: smear paint on the cardboard with ridge, then push it on the Circle. Very simple! You can also use it as a journaling spot.
Paint white on the cardstock and use it as the background.
Glue all the things together. You see that I always use the old paper, that is the way I like it.
You can also write the journaling on the background, see at the right-top.

Tuesday, June 17, 2008

Laura's Boys


"Laura's Boys"
by Giselle Homer


SUPPLIES
Paper: Fancy Pants Sweet Spring
Cardstock: Bazzill Basics, White
Die-Cut Strip: Creative Imaginations Narratives
Chipboard alphabet: Making Memories
Transparency overlays: Hambly Mini Graph, Fancy Pants Frame & My Minds Eye Floral Glitter Cuts/Circle Word
Glaze: Glossy Accents
Journal Die Cut: Teresa Collins
Ink: Color Box Chalk ink

HOW TO
Cut a piece of Sweet Spring paper measuring 10" x 6" and adhere to the white background cardstock 2.5" from the top & 0.5" from the left edge.
Add the Fancy Pants Glitter Cut overlay to the patterned paper aligning its lower edge to the lower edge of the cardstock
Glue a piece of Hambly Mini Graph overlay beneath the patterned paper using small spots of Glossy Accents
Add the Creative Imaginations die-cut strip along the lower edge as shown
Add the photo 0.5" in from the left edge
Glue the circular word overlay (Family) just below the centre of the photo
Ink the edges of a Teresa Collins journaling die-cut, tuck the edge under the patterned paper & glue it into place.
Add the chipboard title
Cut out a flower from the patterned paper & coat with Glossy Accents, leave it to dry. Attach this as shown at the lower edge of the photo
Cut 2 sides from the My Minds Eye floral frame & glue it to the top right corner of the patterned paper

Monday, June 02, 2008

Goofballs


"My Goofballs"
by Jessica Summers

SUPPLIES
Paper: American Crafts A La Carte "Pesto"
Overlay: Hambly Screen Prints
Die Cut: Teresa Collins Journal It Damask
Sticker: Love, Elsie "Zoe Trinkets"
Rubons: Love, Elsie "Riley," Daisy D's "Baseball Stitch"
Felt: Queen & Co Felt Burgandy "Asia" , Autumn Leaves
Acrylic Paint: Making Memories "Daiquiri"
Glitter Paint: Ranger Stickles "Xmas Red" and "Turquoise"
Flowers: Prima Sprites
Brads: Making Memories, Around the Block
Tim Holtz Grungeboard
Ranger Distress Inks "Soot"
White Puff Paint
Black Marker
Playing Card
Buttons
Dymo Labeler
Watercolors

HOW TO
First I used Lucy's tip from the last post, but instead of painting the actual felt, I painted the backing from it (I saved it from a previous project). Outline the flowers with glitter paint. Let that dry completely and put it just left of center.
Make a thick outline around the flowers with the black marker. Then use the white puff paint and outline around the black. Then do one more black outline around the white (once it is dry). This step will help your felt pop against your busy background.
Adhere you Hambly overlay on the right side of your layout. Then on top of that, put your Journal It diecut. Add your photo next.
Around your photo (and on the die cut), use the Daisy D's rubon tape.
I handmade the banner containing the rubon title and colored it in with watercolors.

Wednesday, May 28, 2008

True Love Card

One of the great things about the die cuts from Teresa Collins is they are perfect for making a quick card! Natalie shares a lovely black and white creation with us.


"True Love"
by Natalie O'Shea

SUPPLIES
Bazzill Basics black cardstock
Teresa Collins Damask Die Cuts
BasicGrey Wholly Cow white script rub-ons
Making Memories black and white chipboard buttons
Heidi Swapp white tulle
Making Memories white rub-on words - Remember pack
Making Memories black leather bookplate
Making Memories white brads
HOW TO
Make your base card using black cardstock. Attach the die cut to the front of the card. Attach a black strip of card about an inch from the bottom of the card. Add white swirl and word rub-ons. Tie some tulle around the button and attach to the card using 3D foam tape. Add the bookplate over the words with white brads.

Tuesday, May 20, 2008

Cutie Over There

Today's bright and hip layout is by Mireille. The pictures were taken at a skater park. "I Loved the grafitti and I loved how perfectly Amber fit under the paintings hand. I edited the photo in Adobe's Lightroom to give it an extra pop."

"Cutie over there"
by Mireille Divjak

Supplylist:
Glitter Cardstock: Die Cuts with a View
Patterned Paper: Die Cuts with a View, Teresa Collins
Paint: Making Memories
Paper Lace: Creative Imaginations
Alpha's (foam and velvet): American Crafts
Rub ons - Hambly Screen Prints
Pen: Sakura

How to:
For this layout I used a large photo and cut it with a partial white border. I used glitter cardstock and stamped with bubble wrap and hot pink paint. While the paint dried I cut the shapes out of patterned paper. I adhered the photo with a slight tilt and added the patterned paper as borders at the bottom and on the right side of the photo.
I added the title and used the rubons in between the title and on the corner of the photo.
I highlighted the title with a pen and added white dots along the patterned paper.
I used a small amount of paper lace at the bottom of the picture (for cuteness and to cover up elements I didn't want in my photo.)

Sunday, May 18, 2008

Birthday Wishes

Who wouldn't want to receive a Birthday card like this? Natalie puts good use to the Teresa Collins line with this stunning pink and black card.


"Happy Birthday"
by Natalie O'Shea
SUPPLIES
Bazzill Basics pink cardstock
Theresa Collins Bella Girl patterned papers
Heidi Swapp bling frames
Making Memories woven label
HOW TO
Make your base card from the small XOXO card. Mount a square of the large XOXO onto pink card and attach to your base card. Attach a woven label greeting onto pink card and surround with a bling frame. Mount onto some of the stripe paper and attach to the bottom right hand corner of your card using 3D foam pads.

Monday, May 05, 2008

Once Upon a Time...

Today's project by Emma is one that will blow you away. She was inspired by the Tim Holtz hinges. She said it reminded her of the hinges that decorated very old books.


SUPPLIES:
Bazzill cardstock- Bling (Sugar Cookie), Raven black.
Patterned Papers- Teresa Collins- Damask notepad, Bella Girl Heart with wings, XOXO, Journal-it tags. Fancy Pants- Sweet Spring, Lily. DCWV Pink Stripes
Basic Grey rubons- Euro Edge (black)
Tim Holtz grungeboard Hinges
Corrugated cardboard
Ribbons
Acrylic paint
Clock face
Dymo Labeler
Envelope
Foam pads
Card scraps
Sewing machine
Inks
Acetate


FRONT COVER HOW TO:
-Cut the Bazzill bling cardstock to 8.5”x11”. Ink the edges with brown ink. Draw a vertical line 1” from the left of the layout.
-Cut a 1”strip of cardboard box and cover with pink DCWV paper. Sew two lines along the right edge and apply to the left edge lining up with the pencil line. Add grungeboard Hinges with brads. I painted the hinges with black paint then dry brushed silver paint.
-Draw a rectangle in the centre 8cm from the top and bottom and 6 cm from the left and right. Cut the top, right and bottom lines and score the left edge to form a flap.
-Cut a rectangle of black card 12.5 cm x 15.5 cm. On top of this mount a pink rectangle of card slightly smaller. Apply a rectangle of the reverse of the Heart with wings paper and a torn strip of the front design of the same paper.
-Add this to the ‘flap’ aligning the left edges together. Finish with a decorated tag, matted photo, strip of XOXO crowns design, clock face and flowers from the Fancy Pants paper (I used foam pads to add dimension). Also add the swirl from the Basic Grey rub-ons which has been applied to acetate and painted with acrylic paint on the reverse to pick out the swirls.
-The title was also added using a matted letter ‘o’ from the XOXO paper, font – black jack, and dymo letters.
-At this point, add 8.5”x11” black Bazzill to the reverse of the layout to ‘hide’ the hole. I also added a 2.5” rectangle of the pink DCWV paper and folded back the corner and fixed with a stapler.
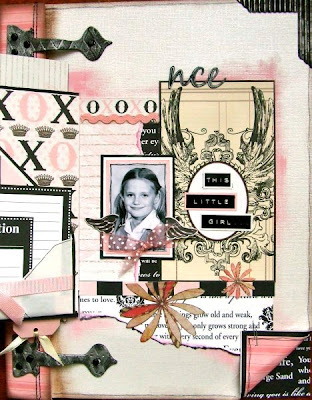
THE FLAP HOW TO:
-Add a rectangle of patterned paper. Fold an envelope in half and decorate with a ribbon bow. Mat onto black cardstock and add to flap. Add Tags from the Journal-it paper.

UNDER THE FLAP HOW TO:
-Add a Journal it tag to the right top side so it overlaps the flap when closed.
-Add a rectangle of the lined Hearts with wings paper the left of this.
-Add a torn and inked section of the Damask notepad paper the bottom so this overlaps the flap when closed.
-Add strips of patterned paper and ribbon to decorate and flowers from the Fancy Pants paper. -Finished with a matted photo and Dymo mini-title. Carefully dry brush pink acrylic paint around the edge.


THE HIDDEN LAYOUT HOW TO:
-Start with a piece of 12x12 black Bazzill.
-Cut a 9.5" x 11” piece and score a line one inch from the left vertical edge to form a flap.
-Add strong double sided tape the reverse of the flap and add this to the reverse of your first layout to form another page. -Add a torn strip of the Damask paper to the right of the layout.
-Add another torn rectangle of Hearts with wings paper to the centre of the layout. On top of this add a matted rectangle of the crowns design and another torn strip of the Hearts with wings paper.
-On top of this add a matted heart cut from the Damask paper and your photo.
-Add a rectangle of the reverse of the Hearts with wings to the right of this, folding back the corners and securing with brads.
-Dry brush cream acrylic paint around the edge.
-Decorate with Fancy Pants flowers, hearts cut from the Hearts with wings design, ribbons and tags and a Basic Grey swirl (again, rubbed onto acetate and the swirls painted on the reverse).
-Add final title and you have finished.

Friday, May 02, 2008

Put Your Money in a Book


It's easy to stick money in a card as a gift, but how about making a little book for it instead? Today Jessica shows us a quick and easy way to glam up a simple gift for anyone.

SUPPLIES:
Patterned Paper: Teresa Collins Damask
Gaffer Tape: Making Memories
Crystal Charm: Heidi Swapp
Distress Ink: Ranger
Liquid Chalk Ink: Colorbox (Pink and Glacier Ice)
Chipboard: Maya Road Trees
Die Cut: Doodlebug Paper Frills Beetle Black
Crop-A-Dile
Ribbon

HOW TO:
The money book measurements are based on a 20 Euro bill. If using different sized bills or currency, allow for a 1/2 inch border (and add an extra 1/4 inch to the length for the spine).

Cut a 6 inch x 3 1/4 inch (15.2 cm x 8.3 cm) rectangle from a thick cardstock or patterned paper.

Find the middle (lengthwise) and use a bone folder to make two vertical creases 1/8 inch (.6 cm) to either side of the middle. This will create the spine of the book.

Use a piece of gaffers tape along the side of the spine as reinforcement.

Stack your money and put inside your book. Use a thin complimentary ribbon (or string) to bind the money to the book, wrapping it around the book's spine and across the center of the bills. Knot your ribbon on the outer spine of the book and dangle a crystal from it.

Ink your chipboard and lightly distress the edges. Flip over the Paper Frills (I only had black, so I'm using the white side), ink with the Pink liquid chalk, then right a short message to the recipient.

Punch two holes through the front and back covers (becareful not to punch through your money!). Tie a bow with another piece of ribbon to tie shut.