Showing posts with label luxe designs. Show all posts

Tuesday, April 07, 2009

Emma- American Crafts

Play it again Sam.
by Emma Trout

SUPPLIES
White Bazzill cardstock
Patterned papers: American Crafts, Backyard (Sizzle, Snap)
Teen (Talent Show, Sadie Hawkins, Teachers Pet, Honor Roll)
Baby (Jack Be Nimble, Mary Quite Contrary)
KI Memories Love, Elsie - Roxie (Funky Fun)
Rub-ons- Luxe Designs
Alphas- American Crafts foam Thickers, Basic Grey white chip
Acrylic paint, brads, gems, string pearls, Pearl dabber.

HOW TO
Cut a 2” strip of Honor Roll paper and glue on right edge of layout. Sponge white acrylic paint along the edge. On top of this add a thin strip of Snap paper and a thinner strip of Talent show.
Cut out white swirls from Bazzill cardstock and add on top (I used a Bo Bunny swirl as a template).
Draw a ‘curtain’ from Mary Quite Contrary paper, doodle and glue to the left of the Honor Roll paper.
Cut around the photo and mark the position in the centre of the layout. Paint a green/aqua floor And paint splashes that go around the photo. Add the Luxe Designs rub-on circle.
Cut out a ‘spotlight’ from the Sizzle paper and add to the layout so it goes behind the photo. When dry, add photo.
Create a ‘pelmet’ by adding layered pieces of Jack Be Nimble, Honor Roll and Teacher’s Pet. Glue into place at the top of layout and sponge with acrylic paint along the edge. Add pearl string.
Add gems, brads and torn pieces of Love, Elsie musical notes paper around the layout.
Paint Basic Grey alpha with Pearl dabber. When dry, add to layout with the Thickers.
Add journaling, finished!

Friday, October 31, 2008

Emma- Trick or Treat "Spinner" Board

The trick-or-treaters how go to Emma's house tonight are in for a surprise! "Instead of the usual routine, I thought it would be fun to make a spinner board, based on the one you use in the game 'Twister'. When the kids knock at the door I will let the board decide whether the kids get a treat, or perform a trick!


Trick or Treat ‘spinner’ board.
by Emma Trout

Supplies:
Patterned paper: Luxe Designs simple pinstripe Lime.
Imagination Project great grid paper black
Daisy Bucket sweet Marbella Stella
Scenic Route Salem
Stamps: Prima ‘build a swirl’
Sugar Loaf alphabet
Imaginisce Hallowhimsy cobweb
Making Memories tiny alpha black
Making Memories flower and brad.
Ranger crackle paint (soot black)
Corrugated card, acrylic paint, glossy paper, inks, chipboard, raffia, reindeer moss, black mesh, album post and spacer.

How to:
Draw a ‘spinner hand’ on chipboard, cut out and add glossy paper on top then trim again. Paint with crackle paint and leave to dry.
Cut a circle of black and orange patterned paper. Cut the orange circle into 30 degree segments and add to black circle. Decorate with torn strips of lime paper, doodling and add Halloween images and stamped swirls. Finish with words ‘trick’ and ‘treat’ in alternate segments.
Paint a large piece of corrugated card with cream, green and black acrylic paint. When dry, stamp with the large Prima swirl and add black mesh. Add the previously made circle to the centre of the card. Decorate with reindeer moss, raffia and an inked flower and brad.
Punch a hole in the centre of the layout and add the ‘spinner hand’, fixing into place with the album post and spacer. Have fun!


Saturday, August 23, 2008

Emma- School Days

School Days
by Emma Trout

SUPPLIES
Black Bazzill Cardstock.
Patterned papers- Prima Dude (Playful, Roundabout, and Star Quality), Fancy Pants (About a boy), and Making Memories {note} worthy Delaney Floral. Luxe Designs (Lined Ledger)
Sizzix slide mount die
Alphabet stickers-Doodlebug
Rub-ons – Doodlebug (All mixed up), stitches (Doodlebug sew easy)
Buttons, card scraps, mini tag, clip, Dymo and chalk.
Luxe Designs journal sticker

HOW TO
Cut a 2” strip of Playful paper and glue along the centre of the cardstock. Add a rectangle of ledger paper to bottom right, and a rectangle of MM paper to bottom left. Add a rectangle of the reverse (Green) Fancy Pants paper to top right. Cut a corner border of Fancy Pants paper and add to top left and bottom right layout.
Cut various colour slide mounts and add to layout. Finish with doodled chequered design and dates.
Cut circle designs from the Roundabout and Star Quality paper and add to layout across centre along with buttons.
Add lines of rub-on stitches and rub-on numbers to top left of layout and finish with white chalk.
Add title to Ledger paper and finish with a Luxe designs journal sticker.

Friday, August 22, 2008

Mireille- Candy Box **SCHOOL TIME**

For some, school is right around the corner. For others, their children have been in for a while already. For the week, we will be showing you some wonderful school based projects. Some will be gifts for the teacher (like today's project), some are layouts about the first day of school, and another will be about the job of a teacher. Stick around and see what we have for you!


Here is a quick little candy box project you can make for your child's teacher.


Candy Box for Teacher
byMireille Divjak

SUPPLIES
Candybox: Bare Elements- Creative Imaginations - John tri favor box
Patterned paper: Luxe Designs- Tricket line
Hearts: Heidi Swapp
Bling: My Mind's Eye
tags: Quickutz

HOW TO
This is really quite simple: cover the small box with patterned paper, decorate it with two hearts which have been outlined with a black marker.
Add a rhinestone and two tags. Mine say, "from Amber to teacher Anita."
Don't forget to put some yummie chocolate inside.

Wednesday, August 20, 2008

Mireille- **TECHNIQUE WEEK**

I kept this layout pretty simple to emphasize the waves and the technique I wanted to show. This year Amber was swimming for the first time without aid and when I saw her splashing around in the sea I knew I had to make a layout with "waves." I choose to create my waves using gesso and ink.


Summer Splash
by Mireille Divjak

SUPPLIES
Cardstock: Bazzill
Lace Cardstock: KI Memories– Journal Teal
Gesso
Ink: Tim Holtz Distress Ink- Faded Jeans, Broken China
Alphabet Stickers – Luxe Designs
Raindots- Cloud 9 Design
Brads- Queen & Co
Pen- Sakura & American Crafts

HOW TO

Paint technique: Take the gesso (a paint primer) and a small sponge and apply the gesso in thick layers on your white cardstock. Make sure you start at the bottom with a thinner layer and leave a thicker layer on top for your "waves." Let it dry. If you want to speed up the drying process you can use your heatgun to dry the gesso. Using the heatgun on the gesso will give it a little more "body."

After your gesso has dried tap Distress Ink onto your craft sheet.
Then take your mini mister, fill it up with water and spray it over the ink.

Put foam on your blending tool and tap it in your water/ink and gently tap and sweep it over your gesso. Tapping and sweeping will both give different effects. Play with it to discover which effect you like best. I used a combination of both to try and give it a most natural looking sea effect.
I used the light shade of blue first. After drying I applied a second layer of ink and this time a darker shade of blue. You can skip parts to let the white of the gesso shine through for a more natural "wave looking" effect. If skipping doesnt work you can use a baby wipe to take some of the ink off.


Use your craft knife to cut away the excess Gesso.
I then adhered the lace cardstock and the pictures. I put a white border over my letter stickers to make them pop more and used some "raindrops" to give it a more water-like look.
Finish with a few fish brads.

Tuesday, August 05, 2008

Rachel- Door Sign **HOME DECOR**

Today we have a simple door sign project from Rachel utilizing a "Toilet" sign she had found on sale.


Zoe's Room Door Hanger
MATERIALS
Patterned Paper: Luxe Designs- Simple Calico Turqouise
Letters: Luxe Designs Black
Other: Pen, Paint

Friday, August 01, 2008

Lucy- Flower Vase **HOME DECOR**

Yesterday was our last day of our KI Memories spotlight. I hope you enjoyed viewing our creations. This week we are going to have another change in our format. We are offering ideas for home decor! Lucy starts us off with handmade flowers displayed in a cute felt pocket turned into a vase.


SUPPLIES
Patterned Paper: Luxe Designs- Polka Dot, Simple Ledger Pink
Clear buttons
Wire
Green paper for flowers
Ribbon: Luxe Designs
Felt Pocket: Creative Lifestyle

HOW TO
Cut some flowers from the papers. I used the Quickutz and free-hand circles.
Now all you have to do is to put a button on the top of your flower and then pass the wire trough the buttons and the flower.
Twist the wire a little and cover it with the green paper.
Make a bouquet and add to the felt pocket.
I added a ribbon and a little tag on the "vase."

Thursday, July 17, 2008

Lucy- Queen of the Words and My Tunes **LUXE**

Well our 2 week Luxe spotlight is over. I hope you enjoyed looking at our projects as much as we enjoyed making them! Tomorrow we will start with a super fun company, KI Memories!

As our grand Luxe finale, I bring you two hip and funky layouts from Lucy. The first layout is dedicated to her sister and the poetry she writes. The second layout is her current top 5 songs. A great way to remember what music you were listening to years down the road!

Queen of the Words
by Luciane Folch

SUPPLIES
Patterned Paper: Luxe Designs- Simple Lined Black, Polka Dot Black
Flowers: made from Luxe Designs Simple Ledger Pink
Luxe Designs Alpha stickers pink
Luxe Designs Journaling block stickers
Luxe Designs epoxy stickers
silk paper or tissue paper(pink)
Book page
Acrylics MM
Felt chandelier from a 1 euro store.

HOW TO
Start by painting the paper from the book.
Water the paint down so it reveals the writing from the page.
Cut a bracket shape from the polka dot paper to make a mat for your photo.
Crumple and wrinkle the silk paper as well with the book paper and place it on your background.
Now you just need to cut some flowers shapes. I used my Quick Kutz but you can just trace it with a pencil and handcut.
Add some stickers as your center for the flowers.
Get some journaling block and add your journaling. I used a black marker because it is the best thing to write with on slick surfaces.
You can glue the felt chandelier with contact glue or fabric glue.
Place your title as you wish.

My Tunes
by Luciane Folch

SUPPLIES
Patterned Paper: Luxe Designs- Simple Grid Black, Simple Ledger Pink
Luxe design journaling block stickers
Luxe designs alpha pink
Ki memories transparent shapes
Ki memories sofities
Acrylic MM
MM glitter tiny alpha
Hambly rub ons
black pen

HOW TO
Let's concentrate on one corner of the page. Choose a side and start working with the paint.
I paint with my fingers here, because it's fun! LOL
Then the main secret is to add some small photos.
The you'll embellish all around the photos with rub ons, scraps of Luxe Designs papers, and some of the cute softies from KI Memories.
Punch some circles and make a half border for your photo using the pink ledger paper.
Then add some journaling blocks. Here I did my top five songs for this summer.
Now you have a bright and fun Lo to remember the songs from 2008!

Wednesday, July 16, 2008

Kirs- Minibook 04 Olivier **LUXE**


SUPPLIES
Patterned Paper: Simply Luxe Designs (Calico, Lined, Grid, Ledger, Dot, Pinstripe)
Stickers: Simply Luxe Designs Alpha Sticker, Epoxies and Labels
Rub on: Simply Luxe Designs Ornate Borders II, Red
Die-cuts: Simply Luxe Designs Jotters
Ribbon: Simply Luxe Designs Stiletto 5/8"
Bazzill Cardstock (black)
Cardboard from a box (from the supermarket)
Old paper
Paint : Making Memories White and Silver
Pen : Unicolor Poscapen Red, uniball pen white and fineliner black
Stamps : October Afternoon

HOW TO
For the three pages that have the corrugated cardboard: cut off three 8 cm x 10 cm pieces. Pull off the first layer of cardboard to expose the corrugated part. Follow this tip from Lucy: first spray the box with water so the top layer will peel away easier.
Paint the cardboard white and add silver to the edges. Glue the vintage paper ontop once dry.
Measure cardstock the same size as the cardboard and paint the edges white.
Use the patterned paper and embellishments as you desire.

Tuesday, July 15, 2008

Rachel- Just the Two of Us **LUXE**

Today we have another Luxe black and white beauty from Rachel Burgess. The monochromatic papers were a perfect match for a layout featuring photos from her 3rd anniversary dinner at a very swish restaurant. Looks like Rachel is living the "Luxe" life!

;)

Just the Two of Us
by Rachel Burgess

SUPPLIES
Black and white Bazzill cardstock
Black pen
Rub Ons- Luxe Designs There’s the Rub "black hearts"
Die Cuts: Luxe Simple Jotters "black," "Friends."
Patterned Paper: Luxe Classic Black II Cookie Dough
Black inkpad
Heidi Swapp Bling borders pink
Offcuts of 2 thin white/ cream ribbons
Sticky foam pads
Plain brad
Black card bill wallet and card saved from restaurant.
HOW TO
Cut pieces from black cardstock to look like cow print patches and arrange on 12x12 white cardstock.
Use a black pen to draw a faux stitch border.
Cut an 8x8 inch square from the patterned paper, ink the edges and attach just off centre towards the upper left of the layout.
Print and trim your photographs to the desired size and arrange on the layout with the friends jotter panel. Use the sticky foam pads to attach one of the photos to add dimension.
Cut the black card wallet down to the desired size and slide the simple jotter panel inside. Tie the outside of the wallet with the ribbons and slide the small card under the ribbon. Attach to the jotter using the brad (this will stop the jotter moving around as much). Apply a heart rub on to white card, cut out and attach over the top of the brad.
Apply the 2 birds rub on to the friends jotter panel.
Decorate various elements of the layout with the bling borders as desired.

Monday, July 14, 2008

**LUXE** CHA 2008 Sneaks

Have you seen the sneak peeks for Luxe's new products? Well let me show you!


Sunday, July 13, 2008

Carole- I Feel Good **LUXE**

At the time Carole made this layout, she had many emotions swelling through her. She felt happy because it was the end of the school year, her two month long holiday would be coming soon, and she was preparing for her wedding. She's been married now for over a week, and I bet she still feels good!! Carole used watercolor pencils to color in the flower images from Luxe's "Color Me...Happy" papers. This simple technique gives a gorgeous texture and dimension to the black and white images.


I Feel Good
SUPPLIES
Papers: Luxe Designs- "Color Me...Happy," Simply Luxe- "Simple Ledger, black."
Buttons
Watercolor pencils
Black pens
HOW TO
Color the flowers with the watercolors pencils and use water to spread the color. Then cut the out and stick them all around the back of the picture making a kind of movement. Put a button in the center of some of the flowers. On white paper, draw the letters of your title using a medium black pen. Then use a fine one to drawn over the letter again. Choose a pen on which you can put water. Color the letters with the watercolor pencils, cut out and adhere to your layout.

Saturday, July 12, 2008

Fanny- My Little Star **LUXE**


My Little Star
by Fanny Delobel


SUPPLIES
Patterned Paper: Luxe Designs- Simply Luxe "Grid," Simply Luxe "Calico," Flip Flop "Tetherball," Color Me... "Starstruck."
Die Cuts: Luxe Designs:- Jotters (aqua)
Alpha: Luxe Designs Alpha Sticker (aqua)
Embellishments: Luxe Designs Epoxies (aqua)
Rub-ons: Luxe Designs There's the Rub Hearts - Black
Watercolor paint
Paint : Making Memories white
black and white pens
'dymo ribbon'
Hessian (Burlap)

HOW TO
Distress jotters and adhere to your distressed patterned paper.
Cut a piece of hessian (burlap) and adhere it in the middle of your LO. Cut a piece of paper (like the "Flip Flop" paper on my LO) distress it and adhere it onto hessian and patterned paper.
Cut stars from the "Color Me...Startstruck" paper and color them with watercolor paint. You can add glitter if you want.
Distress the edge of your pictures (I distressed with scissors) and adhere them on your paper (a big one on the top and 3 medium photos under the first one).
Adhere epoxies, jotters, rubons. and then add white paint around the photos.
Write journaling and add a title with alpha stickers and "dymo ribbon." You can also cut words from the "Color Me" paper like "focus," "shining star," and "focus."
Finally take your black pen and draw doodles and a big frame (along the edge of your LO).

Friday, July 11, 2008

Kirs- Very Cold! **LUXE**

Sometimes heavily patterned paper can take attention away from your photo. With the Simply Luxe line, you do not have to worry about that! Today, Kirs shares a fun and colorful layout using the "Simple Grids" and the die-cut "Jotters."

Very Cold!
by Kirs de ven-Smit
SUPPLIES
Paper : Simply Luxe Designs, Grid Lime
Die cuts : Simply Luxe Designs Jotters Pink
Cardstock White
Vintage paper
Transparancy paper
Fineliner Black
Uni Poscapen, pink
Glitter powder, green
Date stamp
Ribbon with bling bling
Paint : Making Memories white
HOW TO
Adhere the "Jotters" and the vintage paper onto the patterned paper.
The bucket and watersplash are hand drawn onto cardstock. Cut out and adhere.
For your title, use a pink uni poscapen and write the word "Very" onto a piece of transparancy paper. Cut and adhere.
For the other part of the title; paint the back side of the transparancy sheet white and let dry. Once dry, flip your tranasparancy over and hand draw the title with the pink poscapen. Cut out and adhere using 3D tape.
Use glitter around the journaling tag.
Have fun with this!

Thursday, July 10, 2008

Emma- 70's Babies **LUXE**

Using Luxe's "Capris" line for colorful inspiration, Emma wows us with this funky 70's themed layout.


70’s Babies
by Emma Trout

SUPPLIES
Patterned papers: Luxe Designs, Capris – Stripe, Simple Ledger Lime, Oregano, Simple Pinstripe Lime, Sage, Simple Calico Lime, Basil, Simple Dot Lime,Chives.
Luxe Designs Epoxy Stickers- Capris, Simple Lime
Bazzill Cardstock
Dymo tape
Computer generated fonts.

HOW TO
Using a cardstock base,add sections of Luxe Designs patterned papers and epoxy stickers, some of which have been matted onto pink cardstock. When creating the large arrow across the centre of the page, start with a folded piece of card and draw your design away from the crease so you have a folded arrow when cut. Use the same technique for the inside of this arrow using the Ledger line paper to add hidden journaling.
For the ‘70’s’ part of the title, I cut the numbers using a 70’s style font and torn pieces of Oregano paper. Finish with a computer generated sub-title and Dymo lettering.

Wednesday, July 09, 2008

Natalie- Menu Clipboard and Napkin Ring **LUXE**

The next time you throw a dinner party, follow Natalie's project to give your table that extra "wow" factor. She made napkin rings and a menu clipboard using Luxe's "Flip Flop" line.


Menu Clipboard and Napkin Ring
By Natalie O'Shea

SUPPLIES
Luxe Designs Flip Flop See-Saw patterned paper
Luxe Designs Celebrations Jotters (menu card)
Creative Imaginations Creative Cafe mini clipboard
Bazzill Basics blossoms
Blue Buttons
Heidi Swapp white tulle ribbon

HOW TO

Clipboard:
Cover the mini clipboard with the blue patterned paper. Add the menu Jotter to the centre of the clipboard with 3D foam tape. Cut two flowers from the patterned paper. Add some dimension to the leaves by rounding over the back of a pair of scissors. Layer on top of each other and add to the bottom left hand corner of the clipboard. Attach a blue flower to the centre of your paper flowers and then a white flower on top of the blue flower. Thread some tulle through the button and knot. Attach the button to the centre of the flowers.
Napkin Ring
Cut a strip of the blue patterned paper using the wave of the design as your guide. Stick to make a ring. Cut a flower from the patterned paper. Bend the leaves in the centre to add some dimension. Add the blue flower, white flower and button as for the menu.

Tuesday, July 08, 2008

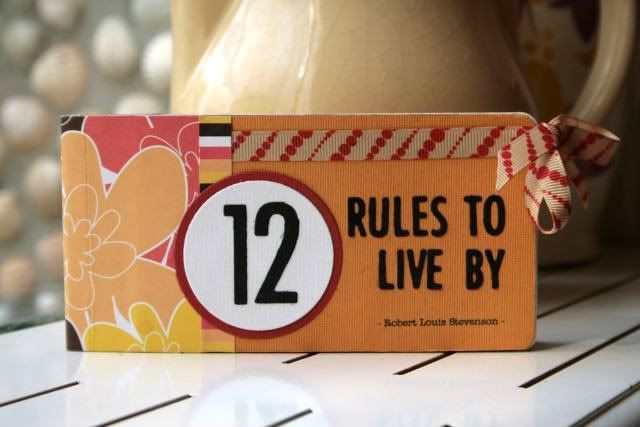
Moniek- 12 Rules to Live By **LUXE**

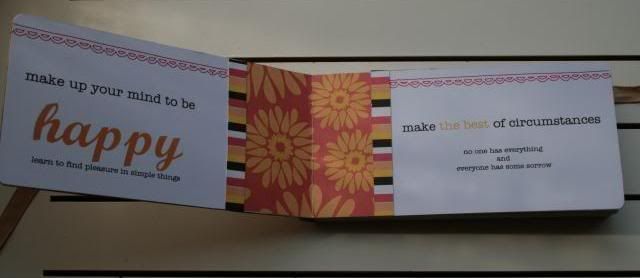
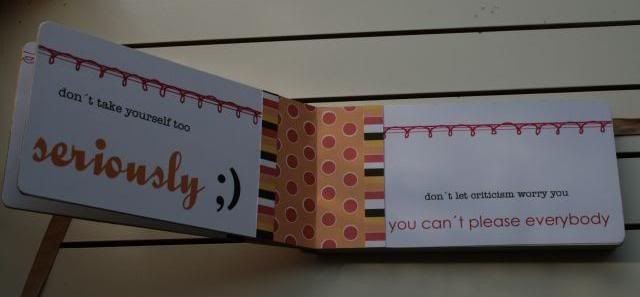
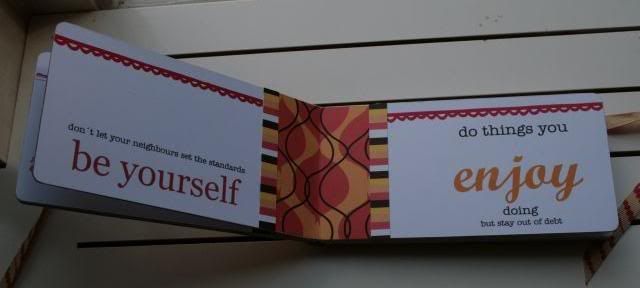
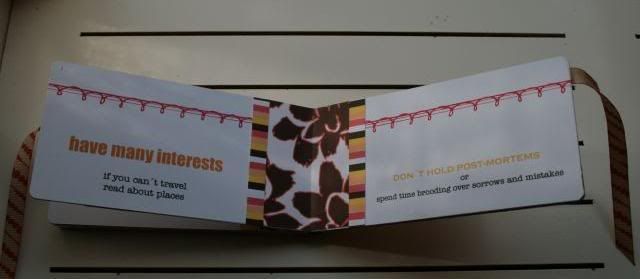
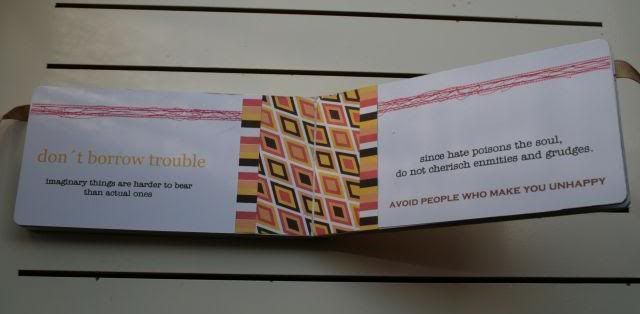
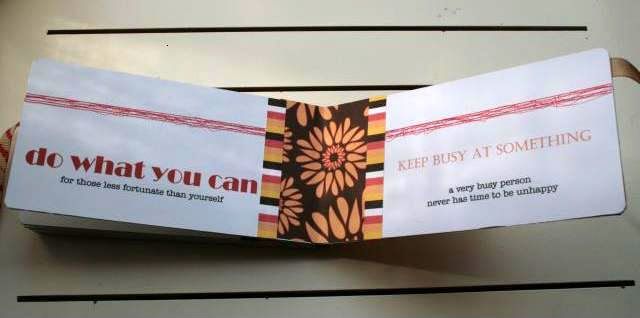
Today we have another Luxe project for you from Moniek. She found something written by Robert Louis Stevenson entitled "12 Rules to Live By." The rules inspired her and she made a mini album that focuses on these rules. For this mini, she uses the new line from Luxe, "Sundress."


12 Rules to Live By
SUPPLIES
Creative Imaginations - mini album
Luxe Designs - Sundress "Lollipop," "Peanut Brittle," "Sundress Stripe," "Jelly Bean," "Caramel."
Luxe Designs - There's the Rub- Lace Borders VI "pink"
Luxe Designs - Ribbon
HOW TO
Use a Word Program to print out the journaling. Use different fonts, sizes, and color.
Each page of the album is uniform. There is a strip of patterned paper in the middle, then a complimentary strip of a different patterned paper on either side. Then a rubon across the top of each page.

Monday, July 07, 2008

Jessica- Two of a Kind **LUXE**

It's my turn to spotlight Luxe Designs! I have to admit, I LOVE the products of this company. I can get both the straight lined graphics and the doodled style all in one. I chose to do a completely black and white layout, showing how you can easily incorporate their two foundational styles. By the way, if you have not picked up any of the "Luxe-urious Stamps," go now!


"2 of a Kind"
by Jessica Summers

SUPPLIES
Cardstock: Bazzill Bling and Bazzill Cardstock with an Edge
Patterned Paper: Luxe Designs- Classic Black "Sleeping In," "Fresh Cut Grass." Color Me "Loved," "Happy." Simply Luxe- Simple Grid "Black," Simple Pinstripes "Black."
Stickers: American Crafts Remarks, Making Memories Tiny Alpha
Stamps: Luxe Designs- Luxe-urious Stamps Corners
Ink: Ranger Archival Ink "Jet Black"
Maya Road Office Sheers
Rick Rack: Lil' Davis Rick Rack "Licorice"
Chipboard: Heidi Swapp
Paint: Tim Holtz Crackle Paint
Brad: Making Memories Pebble Brads, Black and White
Fiskars Ultra ShapeXpress
Fiskars ShapeTemplate Circles

HOW TO:
Cut a piece of the edged Bazzill 5 3/4" x 5 3/4". Center it on your base cardstock and adhere. Doodle around the scallops.
Cut a piece of the "Sleeping In" paper 6"x6". Ink the edges and fold the the lower right corner up once, then fold that fold down. Adhere on top of the black scalloped paper.
Attach your photo off center. Stamp a photo corner using the "Luxe-urious"stamps.
Using the Fiskars shape cutter and template cut 2 2.5" circles, 3 2" circles, 3 1.5" circles, and 3 1" circles using the "Simple Grid, Sleeping In, and Simple Pinstripe" papers. Alternate between the reverse sides of the papers. Ink the edges and adhere the circles to one another, varying placement.
Attach the circle flowers and use rick rack as stems.
Cut various images from the "Color Me" line and "Fresh Cut Grass" and layer around the circles. Bend the outter edge of the petals up for more dimension.
Cut two birds from the "Color Me-Loved" line. Omit the heart from the paper. Instead use a Heidi Swapp chipboard heart. I painted it with black crackle paint and sanded the edges.