Showing posts with label giselle homer. Show all posts

Tuesday, July 01, 2008

Giselle- A Walk in the Woods with Grandpa


"A Walk in the Woods with Grandpa"
by Giselle Homer

SUPPLIES
Cardstock: Bazzill 8.5" x 11"
Patterned paper: Chatterbox Happy Stroll & 7 Gypsies
Chipboard shapes: American Crafts
Small alphabet: Making Memories
Chipboard letters: Cherry Arte
Paints: Ranger's Dabbers, Gold
Inks: Color Box Fluid Chalk, Brown
Glaze: Making Memories Clear Glaze
Rub-ons: American Crafts


HOW TO
Cut a piece of the 7 Gypsies paper to 6" x 7" & round one corner.
Glue this to the base 2" from the top
Cut a corner piece of dark orange cardstock and slip this beneath the patterned paper to form an edge
Add a 6" x4" photo 0.5" from the left edge
Add the small letter stickers to the lower part of the photo
Cut a piece of 'Happy Stroll' paper 11" x 2" and glue this below the photo
Cut 2 thin strips of the reverse of 'Happy Stroll' and add to the top and bottom of the previous paper as shown
Cut a chipboard frame diagonally and add one part to the top left of your photo, to form a corner
Cut a pice of plain cardstock to fit the chipboard circle, add your journaling & glue to the lower right of the patterned paper
To colour the chipboard letters apply a coat of gold Dabber paint and allow to dry.
Apply a layer of brown Chalk ink and before this dries paint on a thin layer of Making Memories Glaze - this will mix with the paint to give the bronzed effect.
Allow to dry overnight before gluing to the layout just below the photo
Apply rub-ons as shown

Tuesday, June 17, 2008

Laura's Boys


"Laura's Boys"
by Giselle Homer


SUPPLIES
Paper: Fancy Pants Sweet Spring
Cardstock: Bazzill Basics, White
Die-Cut Strip: Creative Imaginations Narratives
Chipboard alphabet: Making Memories
Transparency overlays: Hambly Mini Graph, Fancy Pants Frame & My Minds Eye Floral Glitter Cuts/Circle Word
Glaze: Glossy Accents
Journal Die Cut: Teresa Collins
Ink: Color Box Chalk ink

HOW TO
Cut a piece of Sweet Spring paper measuring 10" x 6" and adhere to the white background cardstock 2.5" from the top & 0.5" from the left edge.
Add the Fancy Pants Glitter Cut overlay to the patterned paper aligning its lower edge to the lower edge of the cardstock
Glue a piece of Hambly Mini Graph overlay beneath the patterned paper using small spots of Glossy Accents
Add the Creative Imaginations die-cut strip along the lower edge as shown
Add the photo 0.5" in from the left edge
Glue the circular word overlay (Family) just below the centre of the photo
Ink the edges of a Teresa Collins journaling die-cut, tuck the edge under the patterned paper & glue it into place.
Add the chipboard title
Cut out a flower from the patterned paper & coat with Glossy Accents, leave it to dry. Attach this as shown at the lower edge of the photo
Cut 2 sides from the My Minds Eye floral frame & glue it to the top right corner of the patterned paper

Sunday, June 08, 2008

Elgar's Birthplace

Our layout today is from Giselle and she scraps about a trip to the birthplace of Sir Edward Elgar, an English Romantic composer. The muted colors of her page really help the colors from her photos to pop. Notice her title work too. She used her own handwriting to emulate the handwriting of Sir Elgar.


"Elgar's Birthplace"
by Giselle Homer

SUPPLIES
Cardstock: Bazzill 12" x12"
12x 12 circular sticker: Creative Imaginations Narratives
Transparency: My Mind's Eye, Bohemia 'At the Beach' Frame
Monogram: Creative Imaginations Narratives
Embellishment: Creative Imaginations Narratives Notepaper
Glaze: Glossy Accents
Stamp: Collage Press Journaling circles
Ink: StazOn
Journaling: Handwritten

HOW TO
Carefully place the large circular sticker over a piece of Bazzill cardstock (NB: The sticker's overall size is smaller than 12x12, so trim the cardstock to fit).
Arrange the four photographs so that those on the outside edges fit slightly under the inner rim of the circle.
Trim the transparency frame to size and glue in place with small dabs of Glossy Accents, ensuring that it doesn't show through.
Cut the embellishment from the CI Narratives Notepaper & add Glossy Accents glaze, leave to dry completely.
Add the monogram to the centre of the embellishment & then glue it below the middle photograph.
The title was hand drawn to copy Edward Elgar's signature but could just have easily been made with rub-ons or other letters.
Stamp the journaling circle below the title and hand write the journaling.

Thursday, May 29, 2008

Dear Old Dad

Don't forget Father's Day will be here soon! Here is a card idea for that special day.


"Dad"
by Giselle Homer

SUPPLIES
Cardstock: Bazzill
Papers: Making Memories 5th Avenue
Stickers: Creative Imaginations
Monogram: Creative Imaginations
Rub-Ons: Making Memories

HOW TO
Cut a strip of patterned paper approx 1/3 the height of the card and glue to the lower edge
Attach a patterned sticker strip to the top edge of the card
Attach another strip between the patterned paper & the cardstock
Add the monogram leaving enough space to it's right to complete your required word using the rub-ons
Add a row of sticker flowers either side of the monogrammed word

Saturday, May 24, 2008

The Roman Baths


"The Roman Baths"
by Giselle Homer

SUPPLIES
Cardstock: Bazzill 8.5" x 11"
Papers: Basic Grey Boxer
Scalloped cardstock: Bazzill
Journaling circle: Creative Imaginations Narratives Note Paper
Stamp: Autumn Leaves
Ink: StazOn
Chipboard letters: American Crafts
Letter stickers: Carolee's Creations Adornit
Photo turns & embellishment: 7 Gypsies


HOW TO
Cut a piece of patterned paper 4" x 11" & glue it at an angle along the left of the cardstock base
Cut an 11" edge from the scalloped cardstock and glue this behind the left edge of the patterned paper
Arrange four photos (sizes ranging from approximately 4" x 3" through to 2" x 2.5") as shown
Trim the journaling circle and glue this over the uppermost photo and underneath the small photo
Hand write your journaling
Add the title using the stickers and chipboard letters in the space to the left of the small photos
Stamp 2 images above and below the journaling circle to make a visual connection to the photographs
Cut a circle of patterned paper to fit behind the circle embellishment & write the date, glue this between the 2 smaller photos
Add the 2 photo turns to the left edge of the top photo

Tuesday, May 06, 2008

Sunshine Coast

Today's layout from Giselle uses the new BasicGrey Boxer line. The colors of the paper matches perfectly with the atmosphere of her photos.


SUPPLIES
Paper: Basic Grey Boxer
Cardstock: Bazzill Basics
Die-Cuts: Basic Grey Boxer
Chipboard alphabet: Cherry Arte
Other alphabet: Cut using Provocraft Cricut
Flourish shape: Tim Holtz Grungeboard
Stamp: 7 Gypsies
A scrap of semi-gloss photo paper
Inks: Color Box Chalk Inks, brown and blue

HOW TO
Print a photo measuring 2.5" x 3" and hand cut a 'window' frame shape from the photo paper to fit over it.
Glue the photo to the back of the frame.
Ink a Grungeboard flourish shape first with brown and then with blue ink, dabbing to give a mottled finish.
Colour the title letters in the same way matching the brown hues of the patterned paper.
Cut a strip of Boxer paper measuring 11" x 3.5", tear & ink the lower edge.
Glue this to the background cardstock approximately 4" from the top edge.
Add a 6" x 4" photo 1.5" from the top edge and 1" from the left edge.
Attach the framed photo at an angle to the right of the main photo.
Glue the Grungeboard to the left of the photo with pvc adhesive.
Stamp the 7 Gypsies circular dots in 3 places, as shown, using a scrap of paper to mask parts of the image.
Add a circular die-cut shape to the top stamped image & a flower die-cut to the centre.
Attach the title using pvc adhesive & hand write the journalling.

Tuesday, April 29, 2008

A Triptych Card

Over the next couple of weeks, we plan on turning up projects suitable for one of the most important people in our lives. Mother's day will be here next month (some countries have already had it) and we hope to jumpstart the holiday with new ideas. Giselle launches our theme with a marvelous alternative to the greeting card.


A TRIPTYCH CARD
This is a lovely idea for a greetings card that you want to be just that little bit special.

SUPPLIES:
Paper: Making Memories 5th Avenue
Die-Cuts, Monogram & Stickers: Creative Imaginations Narratives
Chipboard alphabet: Cherry Arte
Paint: Rangers acrylic Paint Dabber
Brads: Making Memories
Ribbon: American Crafts
Rub-ons: American Crafts
Flowers: Prima marketing
Chipboard 9" x 6"
Colorbox Chalk Ink pad
Double sided tape
1.5" Circle Punch

HOW TO:


Using the template as a guide cut the triptych shape from a piece of 9" x 6" chipboard
Score & partially fold vertically along the 2 lines shown, giving you 3 x 3" sections
Paint all the edges with the Ranger Dabber & leave to dry
Cover the front and back of the triptych with the Making Memories patterned paper

OUTSIDE COVER
Add a strip of the Narratives die-cut sticker along the lower edge
Using the punch cut 4 circles from the floral paper and attach to either side of the 2 outside top edges, lining them up on each side of the card
Place the Monogram of your choice at the top right corner and embellish with 3 Prima flowers, with brad in the centres.
Adhere these with double sided tape

INSIDE SECTIONS
Crop 3 photos to 2.75" x 1.75"
Tear 3 pieces of paper so that they're slightly larger than the photos & ink the edges
Glue the photos at an angle onto the torn pieces
Glue one of the mounted photos to each of the 3 sections of the triptych card
Add a blue die-cut border to the lower edge of the card
Add rub-ons and die-cut decorative edges to the photos as required
Glue the title above and below the centre photo
Embellish the triptych with rub-ons, stickers, Prima flowers and brads
Cut 6 pieces of ribbon to 2" lengths, fold in half and secure with brads.
Add these to 2 of the top edges secured with double sided tape

Wednesday, April 23, 2008

Mmmmmwah!!

Giselle shares a beautiful blue and dark grey layout with us today. We love the brads in the middle of the flowers on the Creative Imaginations Die-Cut circle. There are lots of circles and scallops to unify the look of the layout.

If you will be going to the mini Scrap-A-Ganza in Stratford-Upon-Avon, be sure to keep an eye out for Giselle!


MMWAH!

SUPPLIES:
Paper: Creative Imaginations Narratives
Circle Die-Cuts & Stickers: Creative Imaginations Narratives
Chipboard alphabet: American Crafts
Paint: Rangers acrylic Paint Dabber
Glaze: Making Memories Pearl Glaze
Brads: Making Memories
Cardstock: Bazzill Bling


HOW TO:
Cut the background paper to 8.5 x 11 and mark where the photo will be placed.
Arrange the 2 large circle die cuts so that they overlap each other.
Adhere the photo approx 2.75" from the top arranging it to fit both under & over parts of the die cut circles.
Add a decorative border to the right edge.
Paint the chipboard letters using Rangers acrylic paint Dabber and then add a coat of Making Memories Pearl Glaze.
Glue the letters to a piece of Bazzill Bling cardstock and cut around the letter shapes.
Adhere below the photo.
Add brads to the flowers shapes in the larger die-cut circle.
Add the journaling sticker below the top right corner of the photo.
Attach an appropriate phrase cut from the Narratives paper below the photo.

Tuesday, April 15, 2008

Let's Get Snuggly with Giselle

Giselle sure does know how to show us the beauty in simplicity!


"SNUGGLED"
SUPPLIES:
Paper: Creative Imaginations Narratives
Circle Die-Cuts & Stickers: Creative Imaginations Narratives
Foam alphabet: American Crafts
Acrylic Flowers: Making Memories & American Crafts
Cardstock: Bazzill
Buttons: Making Memories
Ric-Rak
HOW TO:
Cut the background paper to 8.5 x 11 and adhere the the photo approx 1.75" from the top and the left edge. Place a single Die-cut circle partially behind the photo at the top left corner. Add a frame from the Creative Imaginations Narratives to the right side of the photo. Place the title onto a strip of Bazzill cardstock & glue it below the photo. Add the acrylic flowers with a button for the centre. Add three more shaped buttons alongside the title. Add the ric-rak above and below the photo as shown.

Monday, April 07, 2008

2 layouts from Giselle

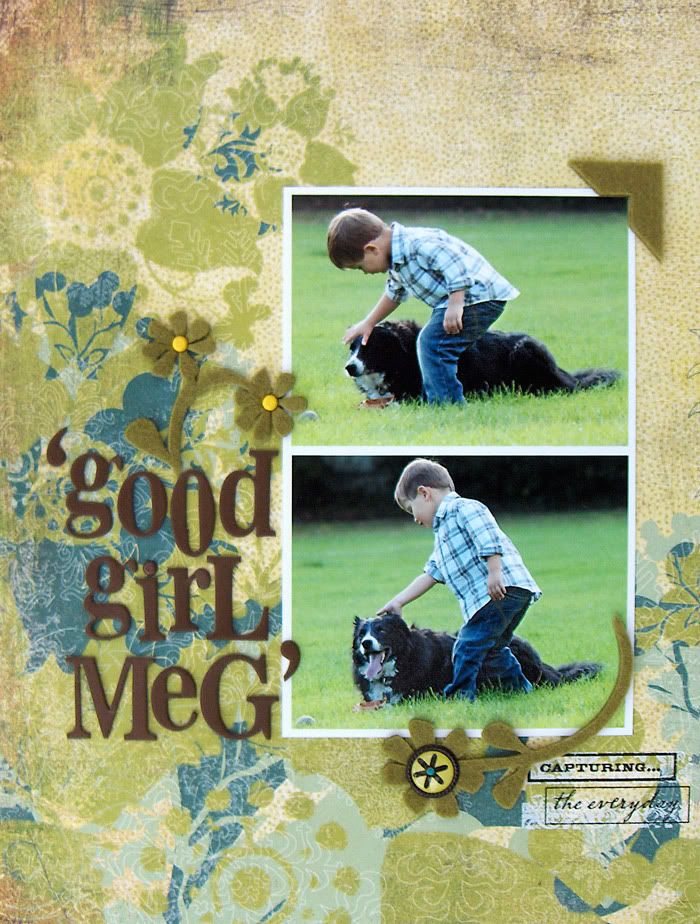
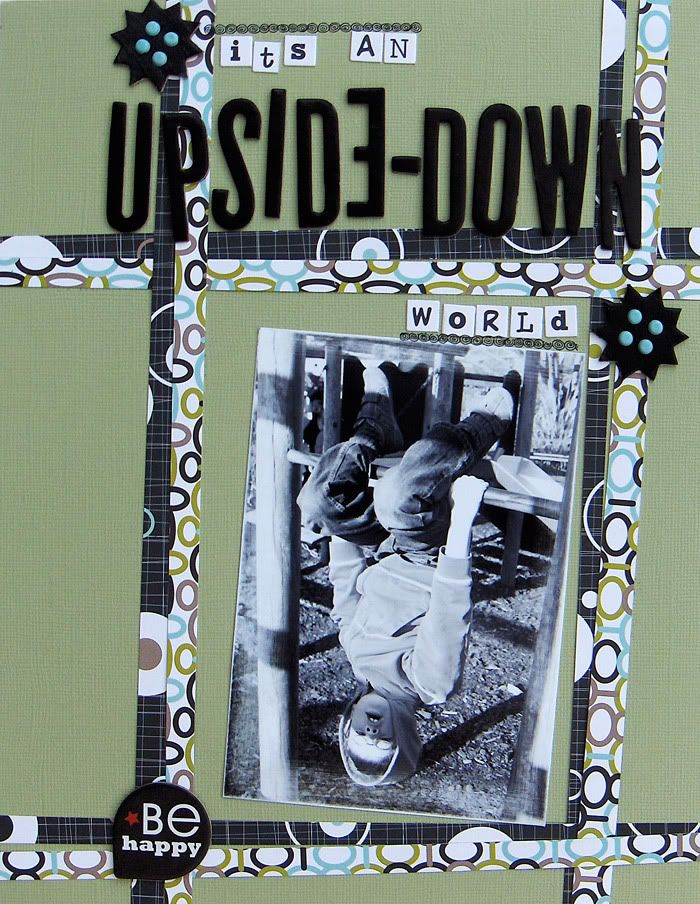
We have a bit of catching up to do here at A Daily Inspiration! So today we have two layouts from England's very own Giselle Homer. Check out the fab felt in the first layout from Fancy Pants. And notice in her second layout the single upside down chipboard letter that correlates with the photo/theme of her page!

GOOD GIRL MEG
SUPPLIES USED
Paper: Basic Grey Fruitcake
Chipboard alphabet: Heidi Swapp
Felt shapes: Fancypants
Rub-ons: Daisy D's Snapshots
Brads: Making Memories

Cut a piece of BG Fruitcake to 8.5" x 11" and use as the base
Take 2 photos each sized 4" x 3" and print with a white border
Adhere these approx 2.5" from the top & 1" from the right edge of the base
Add the felt embellishments and attach the brads
Make up the title using the chipboard letters
Apply the rub-on phrases below the photos


UPSIDE-DOWN WORLD

SUPPLY LIST:
Cardstock: Bazzill Basics
Papers: American Crafts Metropolitan
Chipboard alphabet: American Crafts Chipboard Thickers
Chipboard Buttons: Maya Road
Small Letters: Scrapworks
Chipboard Embellishment: Cherry Arte
Rub-ons: American Crafts
Brads: American Crafts
Glaze: Making Memories Clear Gloss

HOW TO:
Cut a piece of Bazzill cardstock 8.5" x 11" and use as the base
Sand the edges of a 6 x 4 photo & adhere it at an angle, approximately 4" from the top an 2" from the right edge of the base
Cut 8 strips of patterned paper in varying widths & arrange randomly around the photo to form a frame
Make the title using the Thickers and the small letters (if appropriate)
Apply the glaze to the chipboard buttons using a paintbrush & allow to dry
Attach the buttons as shown, using the brads
Adhere the embellishment in the lower left corner of the patterned strips
Apply the rub-on pattern along the edges of the small letters

Wednesday, March 05, 2008

Inspired by Home!

Today's inspiration is by Giselle - she has created this stunning mini book inspired by and featuring her home. The mini book features the things that make home for Giselle.
Although every mini book is different and only meant to be an inspiration rather than a class. Giselle has however explained in brief how she has created it!


Materials list:
Paper: KI Memories, Jack & Abby
Cardstock: Bazzill Basics
Chipboard letters: Heidi Swapp
Acrylic & Felt flowers: American Crafts
Epoxy Stickers: KI Memories, Jack & Abby
Ribbons: American Crafts
Brads: Making Memories
Mini Book: Maya Road
Rub-Ons: American Crafts
Cut all photos to 3" square

To create:
Remove the book rings so that all the pages are separated.
Cover each page of the chipboard book with a selection of plain cardstock & patterned papers.
Sandpaper the edges to remove any overhanging pieces of paper or cardstock
Ink the edges of the pages in colours to match your papers
Adhere the photos, one to each page, and embellish with appropriate stickers, rub-ons & flowers etc
Cut words from the Jack & Abby 'Word' paper, ink the edges and add to the pages where required
Fold small strips of ribbon in half and attach beneath the photos on some pages, allowing them to peek out from the page edges
Attach strips of ribbon to the tops of some pages with felt flowers and brads
Hand write any journaling alongside the photos
Reassemble the pages in the correct order and add the book rings

Thursday, February 21, 2008

Sometimes!

Todays inspiration is by the UBER talented Giselle, she takes clean and simple to a whole new level! We love the emphasis on the subject (her grandchildren) and the fact that she has used bling on a bay page!


Materials List:
BasicGrey Figgy Pudding - Red Ryder
KI Memories Pop Culture - Hopscotch Red Hot
Chipboard shapes (Make not known)
Making Memories Pearl paint
White paint
Doodlebug letter sticker
Heidi Swapp jewel stickers
Black pen
White pen

To Create:
Cut a piece of Red Ryder paper to 8.5" x 11".
Cut a 3.5" strip from the lower edge and flip over to the reverse side. Adhere these 2 pieces to a cardstock base.
Cut a piece of KI Memories Pop Culture approx 4.5" x 8" and adhere to the top right side. Add the photo. Add the title using the Doodlebug stickers.
Paint the chipboard with white paint & allow to dry. Add a coating of MM Pearl paint & when that's dry add black dots around the edges.
Replace a letter in the title with a chipboard shape (if appropriate). Use a jewel to dot the 'i' (again if appropriate).
Add the journaling in white below the photo. Adhere another shape to the right of the journaling. Place the HS jewels around one side of the journaling and on the top right corner of the photo.